Adding Continue with Google or Sign in with Google allows users to create an account or sign in using their existing Google Account instead of creating another username and password.
For a web application, the process involves two sides:
Google Cloud / Google Auth Platform
This is where you create and configure the OAuth application and obtain the Client ID.
Your website or application
This is where the Client ID is integrated and Google’s authentication response is processed.
Google currently recommends Google Identity Services for Sign in with Google. For authentication, the standard identity scopes are openid, email, and profile. (Google for Developers)
Before You Start
You should have:
- A Google Account
- A website using HTTPS
- Access to your website/application configuration
- The domain where Google Sign-In will operate
- A support/contact email
- Ideally, a Privacy Policy and Terms and Conditions before making the integration public
You do not need to purchase Google Cloud credits simply to create the OAuth client for this setup.
Steps to obtain Client ID from Google Cloud / Google Auth Platform
Step 1: Open Google Cloud Console
Sign in to Google Cloud Console and create a project specifically for the application you are integrating.
For our implementation, we initially had another Google Cloud project but decided it was cleaner to create a dedicated project:
Oe – Skills eCourses
Using a dedicated project makes the OAuth configuration easier to identify and manage later.
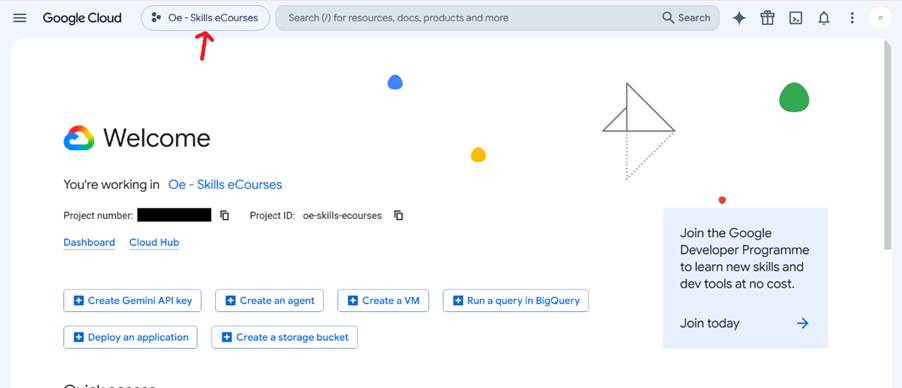
See the below screenshot:
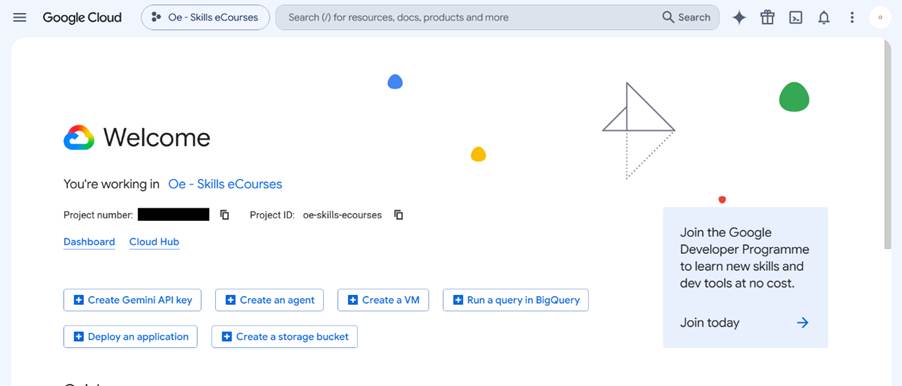
In above screenshot, at the left-side of the header after Google Cloud logo you can see 3 dots with “Oe – Skills eCourses”. That is where you will have to click to create a Project.
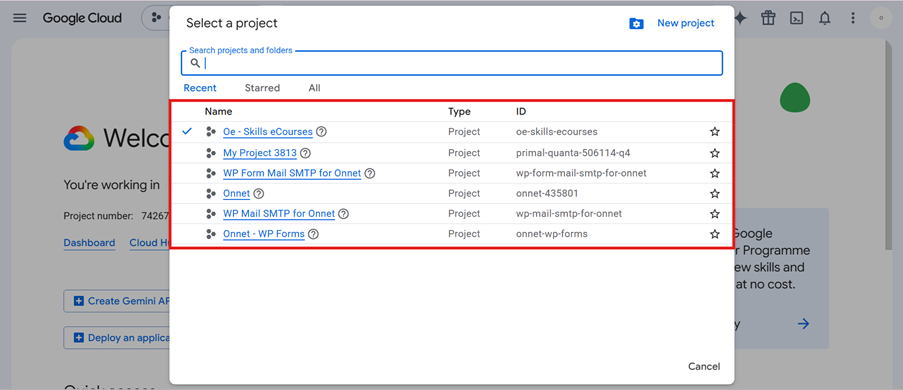
After you will click, you will get a pop-up window where you will have to create a New Project. Please see below screenshot:
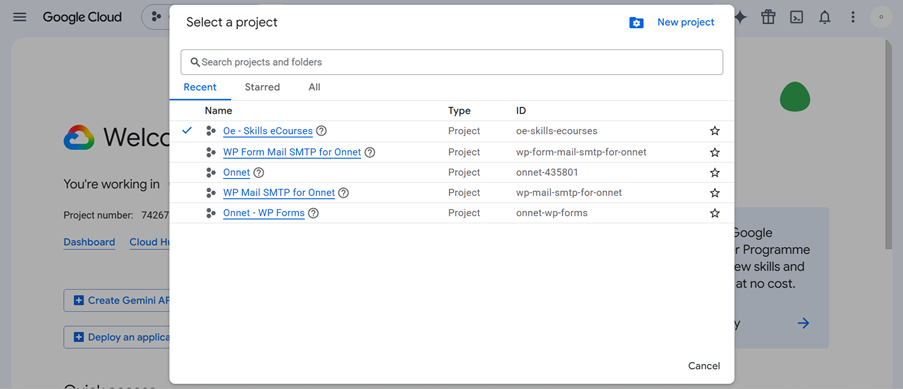
Click on New project at the right-side of the pop-up window and you will go to New Project page. See below screenshot:
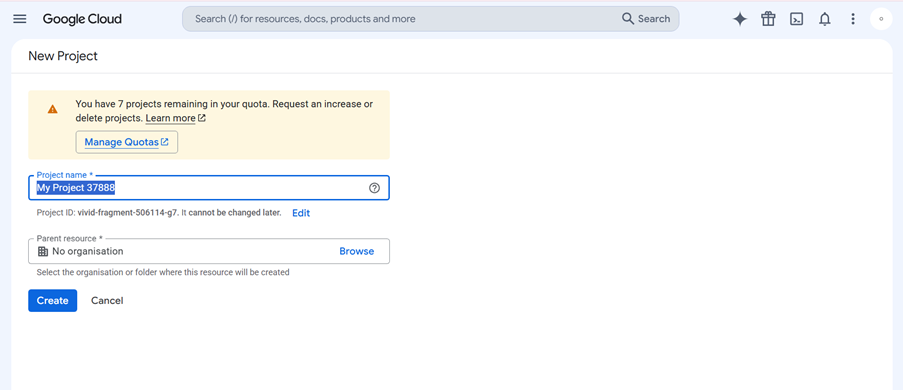
Here give the Project Name, for example, we gave Oe – Skills eCourses and hit the Create button.
After the project is created go the header after Google Cloud logo where you can see 3 dots and click on it to select the project you created. By default the project you created should be selected if not please follow the step. See below screenshot:
Click on it and select the project you have created. See below screenshot for reference:
Step 2: Open Google Auth Platform
With the correct project selected, navigate to:
Google Cloud → Google Auth Platform
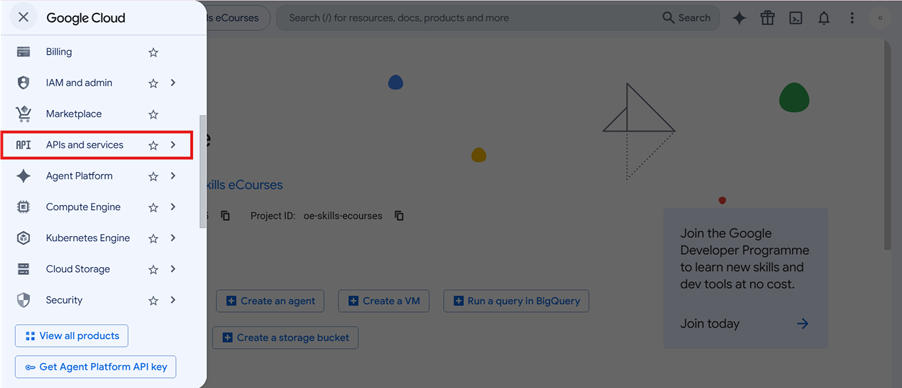
At the top left of the Google Cloud platform you will see a sandwich menu, click on it and scroll till you see APIs and services.
See below screenshot:
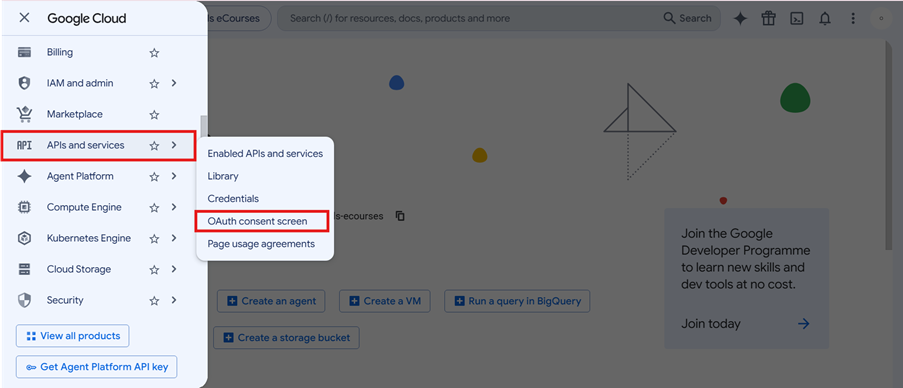
Click on APIs and services then OAuth consent screen. See below screenshot for reference:
Step 3: Configure App Information
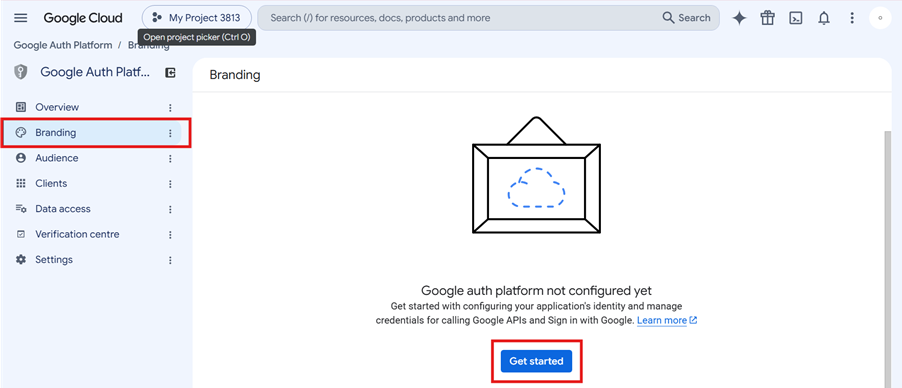
After you have reached the OAuth consent screen in the left menu you will see Branding. Click on Branding and then Get Started. See below screenshot for reference:
The first part of the setup asks for basic information about your application.
App name
Enter the name users should associate with the application.
For example, ours is:
Oe
This is important because the name can appear to users during Google’s authentication/consent process.
User support email
Select an email address users can use if they have questions about signing in or granting consent.
For Oe, we selected the appropriate Google account email during testing.
Click Next.
See below screenshot for reference:
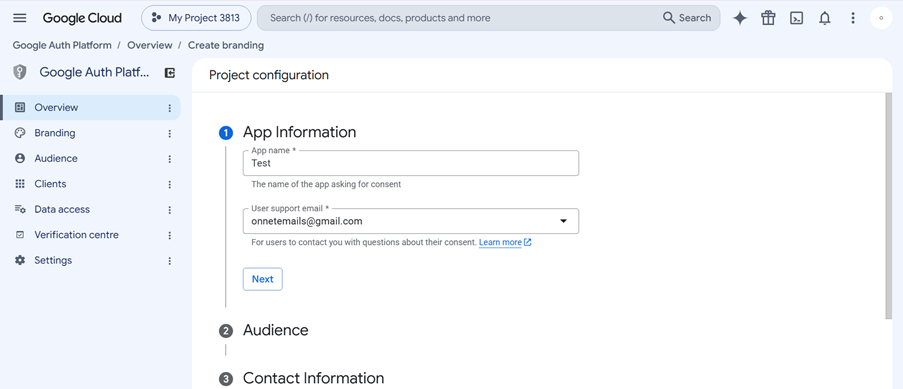
Google describes this information as part of the OAuth consent-screen configuration presented to users. (Google for Developers)
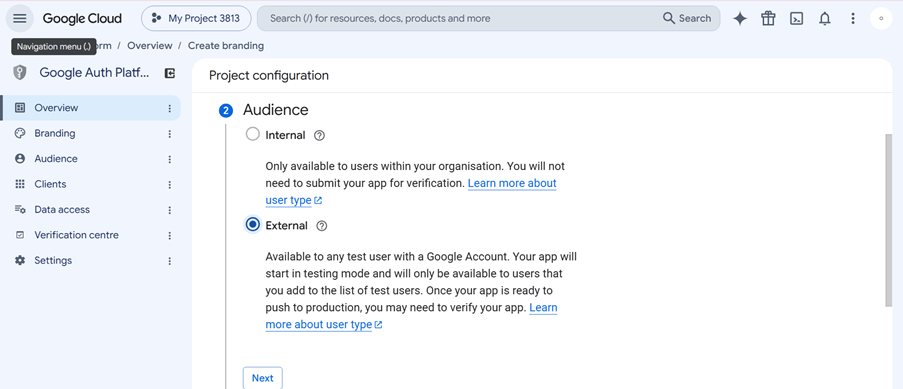
Step 4: Select the Audience
Google will ask whether the application is:
Internal
or
External
For a public website where people outside your own Google Workspace organisation should be able to register, select:
External
Internal is intended for users belonging to your Google Workspace organisation.
Since Oe will eventually allow people generally to create accounts, we selected External.
During development, an External application can remain in Testing status, meaning only explicitly added test users can use it. (Google for Developers)
Reference screenshot below:
Step 5: Provide Developer Contact Information
Google asks for a developer contact email.
This is primarily used by Google to contact you about the OAuth project, including important configuration or policy matters.
Enter an email address you regularly monitor and click Next. See below screenshot for reference:
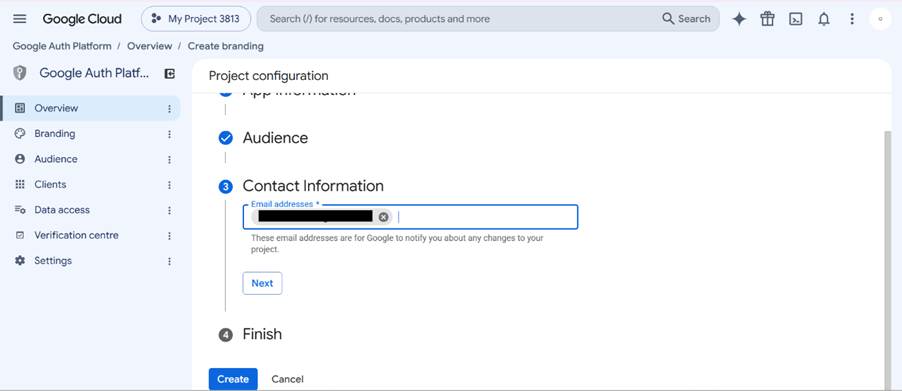
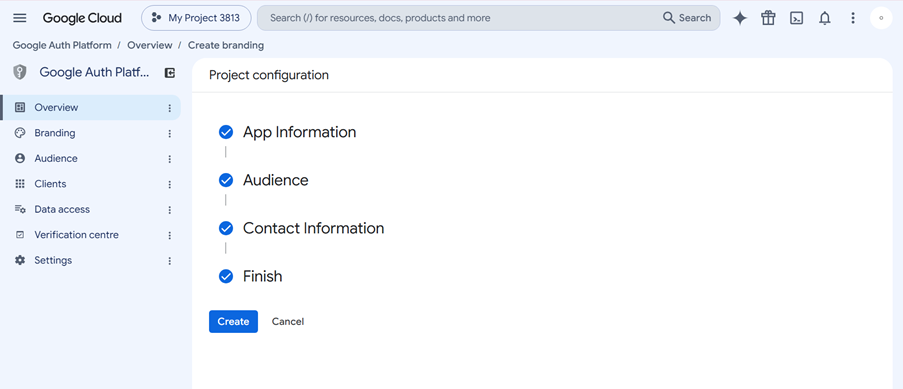
After you have clicked “Next” you have reached the last step here that is Finish. Here you will have to agree to Google API services user data policy and hit the “Continue” button then “Create” button. See below screenshot for reference:
Step 6: Create an OAuth Client
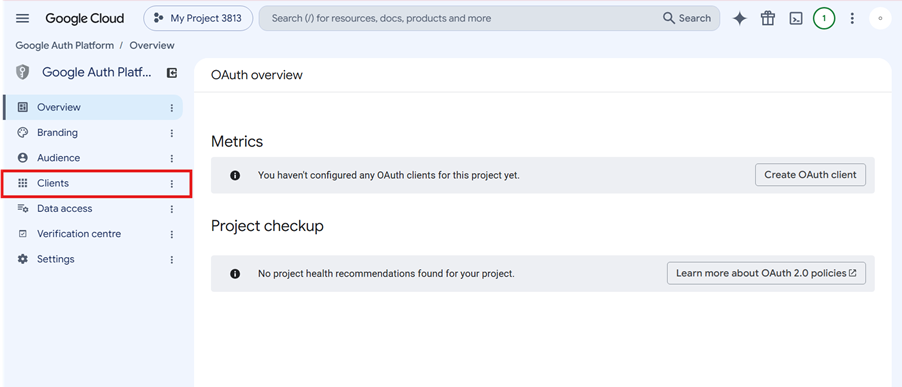
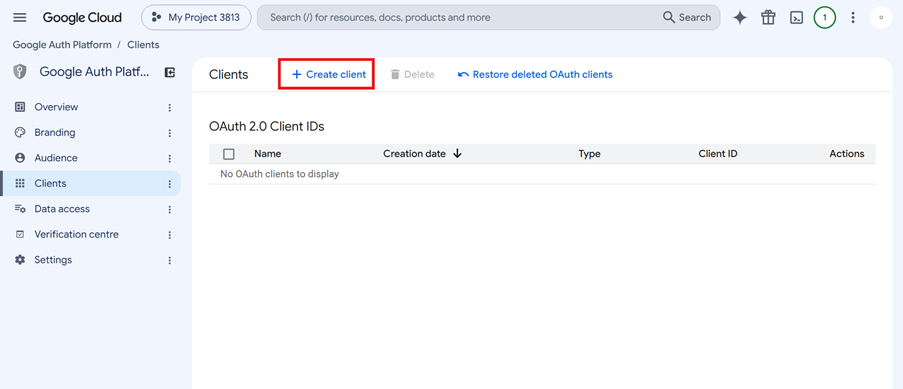
Once the Google Auth Platform has been configured, go to:
Google Auth Platform → Clients then click Create client
See below screenshots for reference:
Here from the Application type dropdown you will have to select Web application. See below screenshots for reference:
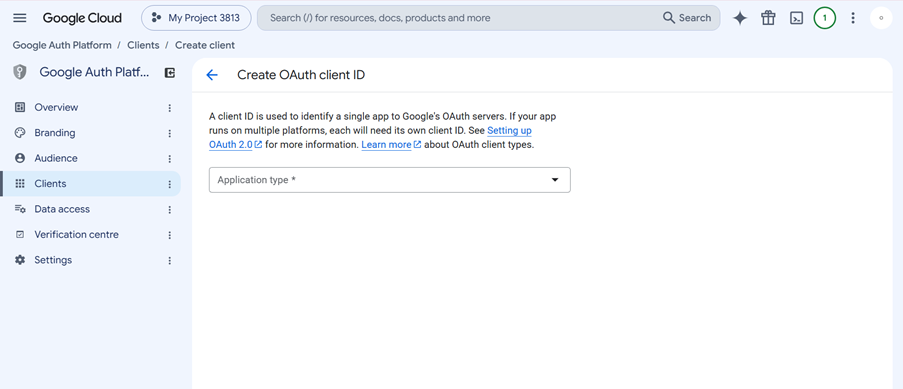
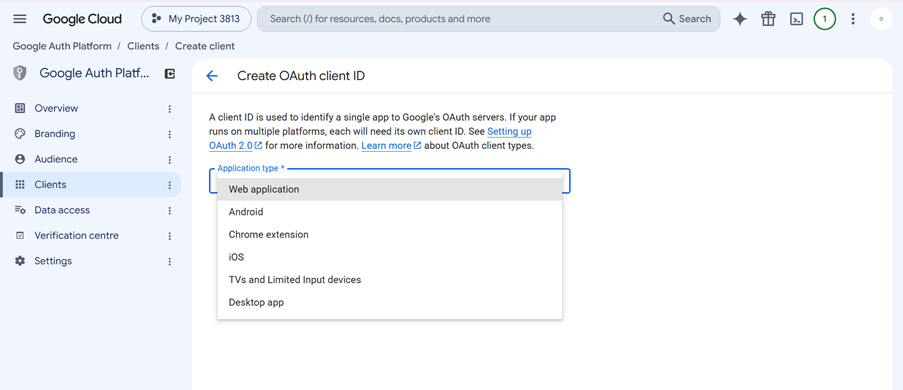
Google states that a Web Application OAuth Client ID is the appropriate client type for applications accessed through a web browser. (Google for Developers)
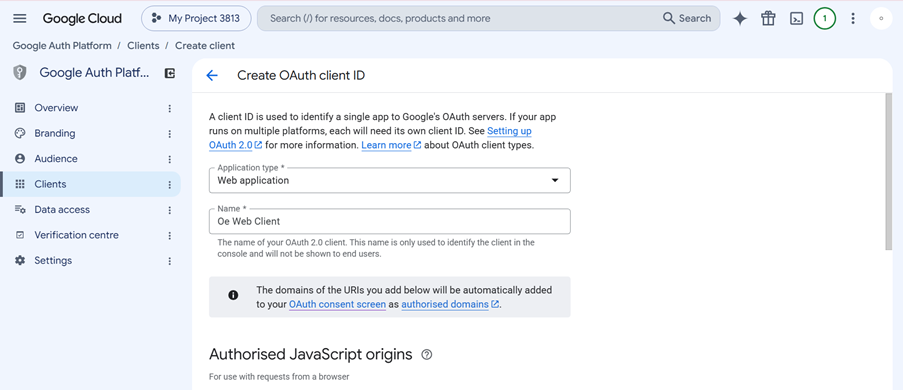
Give the client an identifiable internal name. For example, we gave:
Oe Web Client
The name is for your own Google Cloud management and isn’t the application’s public name.
Please see below screenshot for reference:
Step 7: Configure Authorized JavaScript Origins
This part is particularly important.
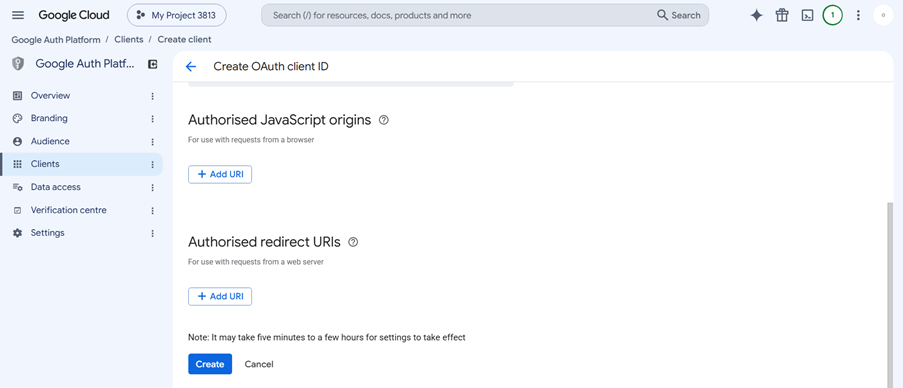
Under:
Authorized JavaScript origins
click:
+ Add URI
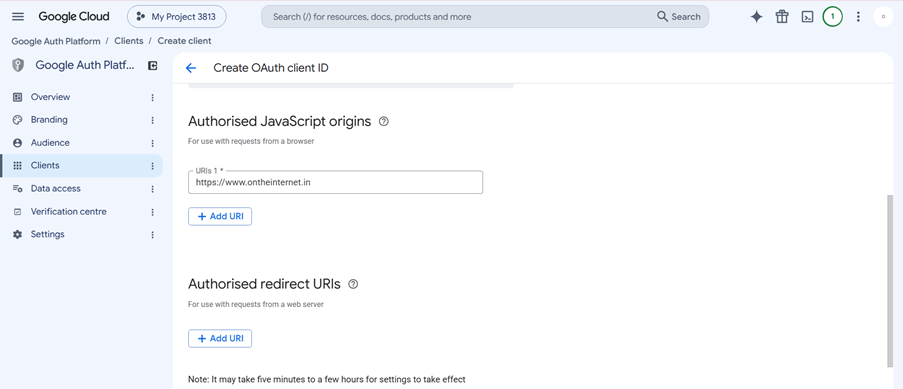
Enter the origin of the website where Google Sign-In will run.
For Oe (our project), we gave:
https://ontheinternet.in
Notice that this is the origin, not the full application URL.
Therefore, even though Oe runs at:
Oe
the JavaScript origin should be:
https://ontheinternet.in
Google specifies that an Authorized JavaScript Origin contains the scheme and hostname and must not contain a path, query or fragment. (Google Support)
So:
Correct
https://example.com
Incorrect
https://example.com/my-app
See below screenshots for reference:
For production websites, HTTPS should be used. Google provides an exception for localhost during development. (Google for Developers)
Step 8: Determine Whether You Need an Authorized Redirect URI
The same screen contains Authorized redirect URIs. Please see below screenshot:
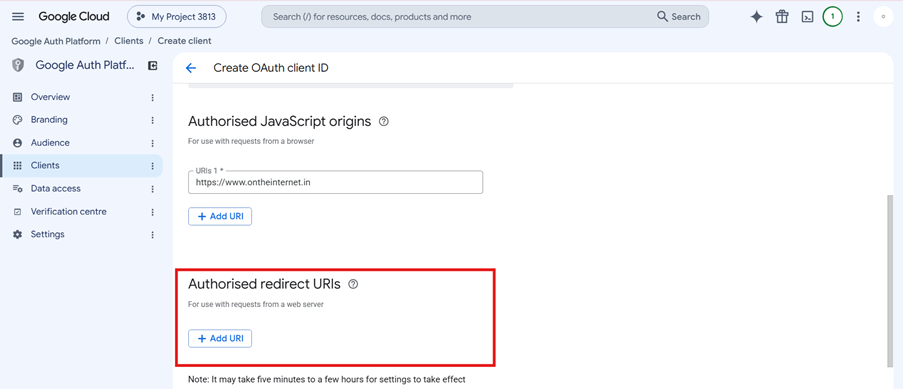
Whether this needs to be populated depends on how your application implements Google authentication.
If Google returns authentication through a JavaScript callback, a redirect URI may not be required.
If your application uses a server-side redirect flow, you must enter the exact callback URL expected by your application. Google sends the user back to that endpoint after authentication. (Google Support)
For someone following this guide for another WordPress plugin or application, check that application’s documentation for its callback/redirect URL.
Step 9: Copy Client ID
After entering the required information, click:
Create
Google will generate your OAuth credentials.
The important value for Sign in with Google is the:
Client ID
It will look approximately like:
123456789012-xxxxxxxxxxxxxxxx.apps.googleusercontent.com
Copy it carefully.
See below screenshot for reference:
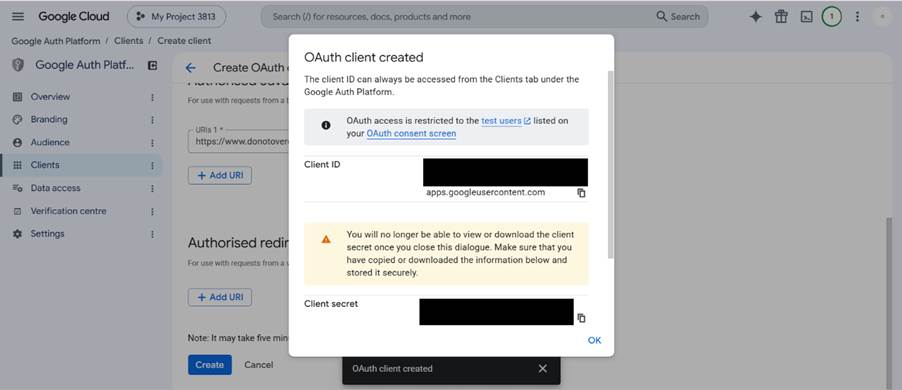
Google’s documentation confirms that this Client ID identifies your application to Google’s OAuth servers. (Google for Developers)
Keep the Client Secret Private
Depending on the implementation, Google may also generate a Client Secret.
A Client ID is designed to be used by the application to identify itself, including in browser-side Sign in with Google integrations. A Client Secret must not be exposed publicly or embedded in client-side code.
For Oe’s implementation, we needed the Client ID.
Step 10: Add a Test User
Before making the application publicly available, it is sensible to test it.
Go to:
Google Auth Platform → Audience
If the Publishing status is:
Testing
scroll to:
Test users
Click:
+ Add users
Enter the Google Account you want to use for testing.
For example:
your-test-account@gmail.com
Save it.
See below screenshots for reference:
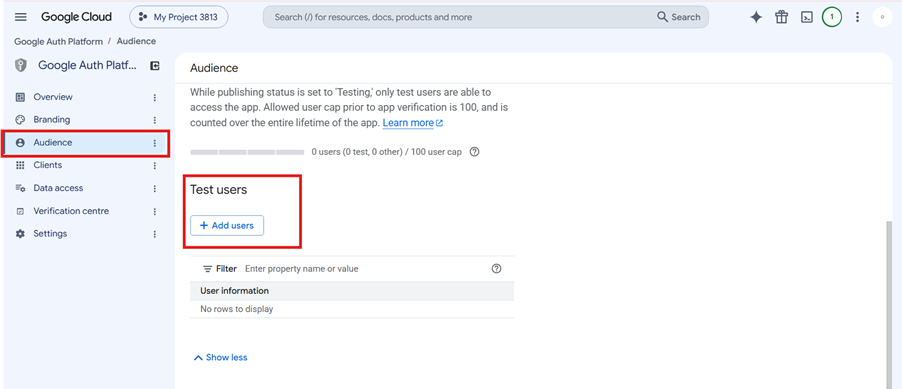
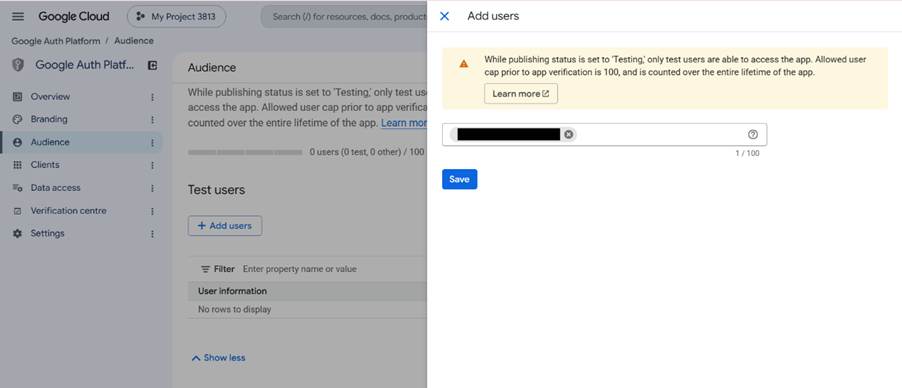
While an External application is in Testing mode, only users added as test users can access it. (Google for Developers)
Step 11: Review Data Access
Open:
Google Auth Platform → Data access
This page controls the OAuth scopes your application requests.
A simple Sign in with Google implementation generally needs identity information such as:
- OpenID identity
- Email address
- Basic profile information
See below screenshot for reference:
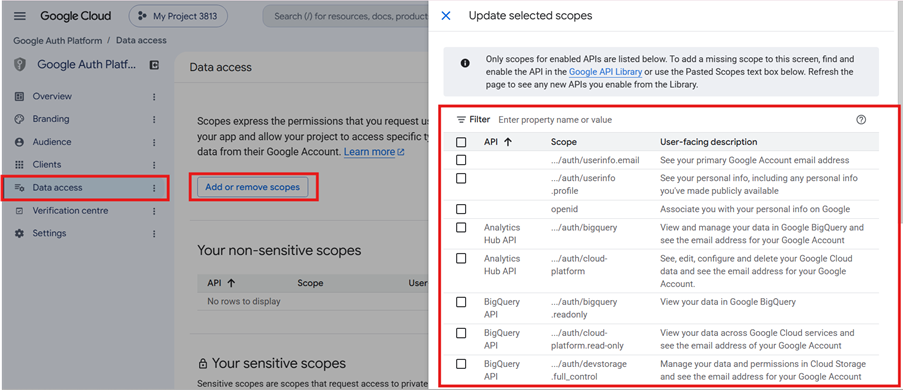
Google identifies openid, email, and profile as the standard authentication scopes. (Google for Developers)
Do not request Gmail, Google Drive, Calendar or other Google data simply for account registration.
A good security principle is:
Request only the information your application genuinely needs.
Google also recommends choosing the narrowest scopes possible; sensitive and restricted scopes can trigger additional verification requirements. (Google for Developers)
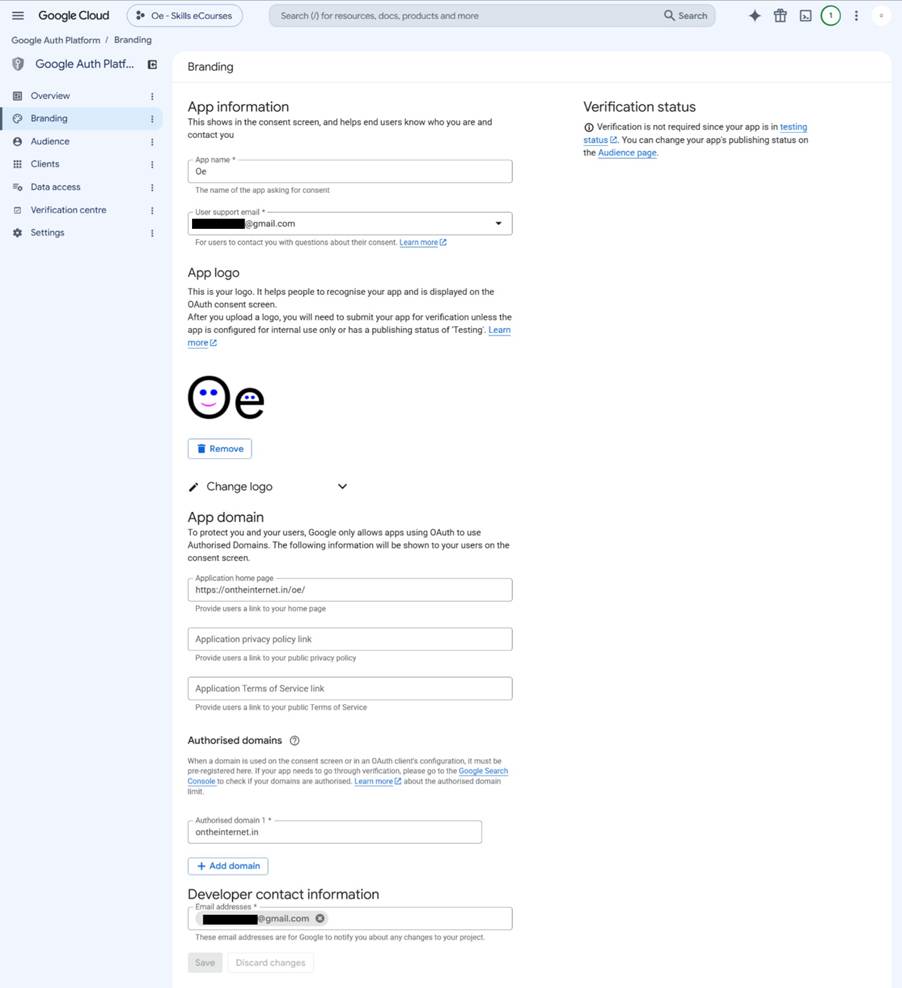
Step 12: Complete the Branding
Go to:
Google Auth Platform → Branding
Here you can configure how your application is represented to users.
Important information can include:
- App name
- User support email
- App logo
- Application home page
- Privacy Policy
- Terms of Service
- Authorized domain
- Developer contact information
For Oe, we configured:
App name: Oe
Application home page:
https://ontheinternet.in/oe/
Authorized domain:
ontheinternet.in
We also uploaded the Oe logo.
Google explains that branding information such as the product name, logo and homepage can appear during the user authentication/consent experience. (Google for Developers)
Privacy Policy and Terms
For a production application, complete the public:
Privacy Policy URL
and
Terms of Service URL
before publishing the OAuth application.
Google can display the application’s Privacy Policy and Terms alongside other application information during authorization. (Google for Developers)
See the below screenshot for reference:
Implement Google Sign-Up and Sign-In on the Website
Adding the Client ID to a setting is only the beginning. The website must also display Google’s sign-in interface, receive the authentication response, verify it securely, create or find the correct local account, and establish the website’s own logged-in session.
The exact screens and files differ between WordPress plugins, website builders and custom applications, but the responsibilities below remain the same.
Choose the Implementation Route
Plugin or authentication service: If your WordPress plugin, membership system or authentication provider already supports Google Sign-In, enter the Client ID in its Google authentication settings. If it requests a Client Secret or callback URL, obtain those values from the same OAuth client and add the exact callback URL to Authorized redirect URIs in Google Cloud. Enable Google Sign-Up and Google Sign-In, choose where the button should appear, and save the settings.
Custom-built application: A developer must integrate Google Identity Services in the front end and create a secure login endpoint on the server. The browser-side button alone is not a complete authentication system.
Important: Use the configuration instructions supplied by your plugin or framework. Do not invent a redirect URI, and never place a Client Secret in HTML, JavaScript, a public repository or another browser-visible location.
Display the Google Button
Load the Google Identity Services library on the Sign-Up and Sign-In pages. Google requires this library to be loaded from accounts.google.com rather than self-hosted. A simple HTML-based implementation can look like this:
<script src="https://accounts.google.com/gsi/client" async></script>

<div id="g_id_onload"
     data-client_id="YOUR_GOOGLE_CLIENT_ID"
     data-login_uri="https://example.com/auth/google"
     data-auto_prompt="false">
</div>
<div class="g_id_signin"
     data-type="standard"
     data-size="large"
     data-text="continue_with"
     data-shape="rectangular">
</div>
Replace YOUR_GOOGLE_CLIENT_ID with the Client ID created earlier and replace the example login endpoint with your website’s real HTTPS endpoint. The endpoint must belong to your site and must be prepared to receive Google’s POST response.
You can also use Google’s JavaScript API and a callback function. In that version, the callback receives response.credential, which is a Google-signed ID token, and sends it to your backend over HTTPS. Whether you use the HTML or JavaScript approach, the token must be verified on the server.
Receive and Verify the Google Credential on the Server
When the user chooses a Google Account, Google returns a signed JSON Web Token (JWT), commonly called an ID token. The website’s login endpoint must not trust profile data merely because it arrived from the browser.
Use Google’s official server-side library for your programming language, or a correctly configured JWT library, to verify all of the following:
- The token signature is valid and was signed using Google’s current public keys.
- The aud (audience) claim matches your website’s Google Client ID.
- The iss (issuer) claim is accounts.google.com or https://accounts.google.com.
- The exp (expiry) time has not passed.
- The request passes your Cross-Site Request Forgery (CSRF) protection. For Google’s HTML POST flow, validate the g_csrf_token value using Google’s documented double-submit-cookie check.
Do not simply decode the JWT and accept its contents. Decoding shows the claims; verification proves that the token is authentic and intended for your application.
Create, Match or Link the Local Website Account
After successful verification, the server can read Google’s user claims. The most important identifier is sub, which is the stable Google Account identifier for your application. Store this value against the local website account. An email address can change and should not be treated as the permanent Google identity key.
The website should then follow a deliberate account-matching flow:
- If the verified Google sub is already linked to a local account, sign in that account.
- If there is no link, check whether the person is already signed in to a local account and intentionally linking Google. If so, verify the action and save the Google sub against that account.
- If a local password account already uses the same email address, use a safe account-linking process instead of silently creating a duplicate or automatically taking over the account. For example, require the user to sign in with the existing method or complete another ownership check before linking.
- If no matching account exists, create a new local user using the verified Google identity and the profile details your website genuinely needs.
- If mandatory website-specific information is still missing—such as country, user type or acceptance of your Terms and Privacy Policy—send the new user to a short completion form before granting full access.
This is how one Google Account can support both Sign Up and Sign In without creating a new website account on every visit. The visible button wording may differ, but the backend can use the same verified identity-processing logic for both actions.
Create the Website Session
Google authenticates the Google Account; it does not automatically log the user into your website’s own account system. After matching or creating the local account, your server must create its normal authenticated session.
- Regenerate or rotate the session identifier after login.
- Send the session cookie only over HTTPS and use Secure, HttpOnly and an appropriate SameSite setting.
- Do not store the Google ID token in browser storage merely to keep the user logged in.
- On logout, destroy the website session. If automatic account selection is enabled, also use the Google Identity Services sign-out guidance so the user is not immediately signed in again.
Handle Success, Cancellation and Errors
After a successful login, redirect the user to the intended page, dashboard or profile-completion screen. Preserve the intended destination safely, but never accept an unrestricted external redirect URL from the browser.
Also show clear messages for cancelled sign-in, an unverified or invalid token, a disabled local account, a missing required field, an account-linking conflict, and temporary server failure. Record technical details in secure server logs without displaying tokens, Client Secrets or sensitive account data to users.
Website-Side Completion Checklist
- The Google button appears on both the Sign-Up and Sign-In interfaces where required.
- The website sends the Google credential only to its own HTTPS backend.
- The backend verifies the token, audience, issuer, expiry and CSRF protection.
- The local account stores and matches Google’s stable sub identifier.
- Existing accounts are linked safely and duplicate accounts are prevented.
- Additional profile fields and legal consent are collected when needed.
- The website creates a secure local session and supports normal logout.
Errors are handled without exposing credentials or sensitive data.
Add the Client ID to Your Website/Application
In your website or application.
The exact location depends on how the application was built.
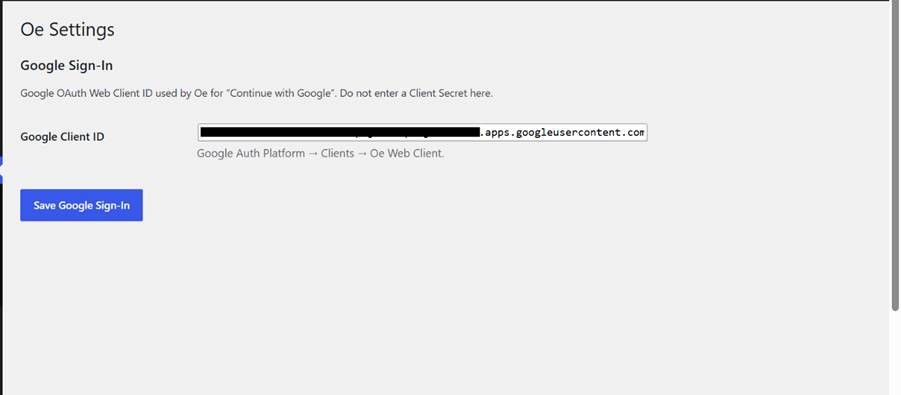
Typically there will be a setting such as:
Google Client ID
Paste the Client ID generated in Google Cloud and save the configuration.
For Oe, this is handled through the Oe plugin’s Google Sign-In settings.
See below screenshot:
The application then uses the Client ID when initializing Google Identity Services. Google also expects the application backend to properly validate the identity information it receives rather than trusting arbitrary user-supplied account information. (Google for Developers)
Test Sign Up with Google
Do not test only while logged into WordPress as an administrator.
Open an Incognito/Private browser window.
Visit the website and choose:
Subscribe / Sign Up → Continue with Google
Select the Google Account that you added under Test users.
Google should authenticate the account and return the user to your application.
Your application can then use Google’s verified identity information—such as the user’s email and profile—to create or locate the corresponding local user account.
Test Sign In with Google
After the account exists, log out.
Select:
Sign In → Continue with Google
Choose the same Google Account.
Instead of creating another account, your application should identify the existing user associated with that Google identity/email and sign them into the existing account.
This is an important implementation rule:
Google Sign-In should not create duplicate website accounts every time the same Google user signs in.
Your website—not Google Cloud—controls how the authenticated Google identity is mapped to its own user database.
Common Errors
origin_mismatch
Check Authorized JavaScript origins.
The domain making the Google authentication request must match one of the registered origins. Google specifically documents an origin_mismatch error for requests originating from an unregistered JavaScript origin. (Google Support)
redirect_uri_mismatch
If your implementation uses a redirect flow, make sure the callback URL sent by your application exactly matches an Authorized redirect URI configured for the OAuth client.
Only the developer can sign in
If the application is still in Testing, make sure the Google Account being used is included under:
Audience → Test users
Sign-In works but creates duplicate accounts
This is generally an application-side account-matching issue rather than a Google Cloud setting. Your application’s authentication logic needs to associate the Google identity with the appropriate existing local account.
Testing Mode vs Production
During development, keeping the OAuth application in Testing is useful because you control which Google Accounts can use it.
But a public application cannot remain limited to your test-user list indefinitely.
When the website is ready for real users, review:
- Branding
- Homepage
- Authorized domain
- Privacy Policy
- Terms of Service
- Requested scopes
- OAuth client configuration
Then change the application’s publishing status as appropriate.
Whether Google requires additional verification depends partly on the application’s configuration and scopes. Sensitive or restricted access can involve additional review requirements. (Google for Developers)
For a straightforward authentication system, avoid requesting unrelated Google API permissions.
The Complete Flow
The overall process can be summarised as:
Google Cloud and Google Auth Platform
Create a Google Cloud Project → Open Google Auth Platform → Configure the App Information → Select the External Audience for a public website → Provide Developer Contact Information → Create a Web Application OAuth Client → Add the Authorized JavaScript Origin → Add the exact Authorized Redirect URI if the implementation requires one → Create and copy the Client ID → Add Test Users → Review the requested Data Access scopes → Complete the Branding, Privacy Policy and Terms of Service information.
Website or Application Implementation
Add the Client ID to the website or application → Choose a plugin-based or custom-built implementation → Display the Continue with Google button → Receive the Google credential through the website’s secure HTTPS endpoint → Verify the token signature, audience, issuer, expiry and CSRF protection on the server → Use Google’s stable sub identifier to find the linked local account → Safely link an existing account or create a new local account → Collect any additional profile information and legal consent required by the website → Create a secure logged-in website session → Handle successful authentication, cancellation, errors and logout.
Testing and Production
Test Sign Up with Google using an Incognito or Private browser window and an approved Test User → Confirm that a new local account is created correctly → Log out and test Sign In with Google using the same account → Confirm that the existing account is opened without creating a duplicate → Resolve any origin, redirect URI, Client ID or account-matching errors → Review the OAuth configuration, branding, domains, policies and requested scopes → Change the application’s publishing status when it is ready for public use.
Once everything is configured correctly, Google authenticates the user’s Google Account and returns a verified identity credential. The website or application remains responsible for securely validating that credential, creating or matching the local account, collecting any additional required information, establishing the logged-in session, preventing duplicate accounts and managing the user’s access.
Credits: