This Privacy Policy explains how personal information is collected, used and protected when you use Onnet’s Content Repurposer, available at https://ontheinternet.in/cr.
The application is operated by Bikash Saha under the name Onnet.
1. Information we collect
Account information
When you create an account using the registration form, we collect:
Your name;
Your email address; and
Your password in securely hashed form.
We do not store your account password as readable text.
Google Sign-In information
If you choose “Continue with Google,” we may receive information required to create and identify your account, such as:
Your Google account name;
Your Google account email address; and
A Google account identifier.
We do not receive or store your Google password.
Gemini API key
If you provide a Google Gemini API key, it is stored in encrypted form and used to send your content-generation requests to Google Gemini.
The key must be temporarily decrypted by the application when making an authorised request to Gemini.
Submitted and generated content
To use the application, you may:
Paste a Blog Post or other written content; or
Provide a Blog Post URL from which content can be extracted.
The submitted content is processed to generate relevant output formats.
Pasted text and generated content are not intentionally stored as generation history in the Content Repurposer database. Users cannot currently access earlier generations after leaving or refreshing the relevant session.
Content extracted from a Blog Post URL may be temporarily cached for up to one hour to operate the service efficiently.
Submitted and extracted content is transmitted to Google Gemini when you request content generation. Google’s handling of that information is governed by its applicable terms and privacy policies.
Marketing subscription information
The Mailchimp Email Sign Up form is separate from Content Repurposer account registration.
If you voluntarily subscribe to Onnet’s informative and marketing emails, Mailchimp may collect:
Your email address;
Your subscription status;
The date and source of your subscription;
Email engagement information; and
Your unsubscribe or consent-withdrawal status.
You can use the Content Repurposer application without subscribing to marketing emails.
Technical information
When you visit or use the application, our website, hosting provider, security services or other technical systems may automatically process limited technical information, such as:
IP address;
Browser or device information;
Date and time of access;
Login or authentication events;
Error information; and
Security logs.
This information may be processed for website operation, troubleshooting, abuse prevention and security. Onnet does not use this technical information to create advertising profiles.
Support communications
If you contact us, we may retain your email address, message and any other information you voluntarily provide so that we can respond to and manage your request.
2. How we use information
We use personal information to:
Create and manage your account;
Authenticate you when you sign in;
Provide the Content Repurposer service;
Process requests through Google Gemini;
Store and use your Gemini API key as authorised by you;
Communicate important account or service information;
Respond to support requests;
Protect the application and its users;
Detect misuse, fraud or security threats;
Maintain and improve the application;
Comply with applicable legal obligations; and
Send marketing emails only when you have separately subscribed.
3. Why we process information
Depending on the circumstances, we process information:
With your consent;
To provide a service you have requested;
To operate and secure the application;
To respond to your communications;
To comply with applicable law; or
For another lawful purpose permitted under applicable data-protection requirements.
You may withdraw marketing consent at any time without affecting your ability to use the Content Repurposer application.
4. How we share information
We do not sell or rent your personal information.
Information may be shared with service providers when necessary to operate the application, including:
Google
Google may process:
Authentication information when you use Google Sign-In; and
Submitted content when you generate content using the Gemini API.
Your use of these services is also subject to Google’s applicable terms and privacy policies.
Website hosting and technical providers
Our hosting, email, security and technical-service providers may process limited account or technical information while providing their services.
Mailchimp
If you voluntarily submit the Email Sign Up form, your subscription information is provided to Mailchimp for managing and delivering Onnet’s informative and marketing emails.
Legal and security disclosures
We may disclose information when reasonably necessary to:
Comply with applicable law or a lawful request;
Protect the rights, safety or security of Onnet, our users or others;
Investigate fraud, misuse or a security incident; or
Establish, exercise or defend a legal claim.
5. Cookies and similar technologies
The application may use cookies or similar technologies that are necessary for:
Maintaining your login session;
Authenticating your account;
Protecting forms and preventing misuse;
Remembering essential settings; and
Maintaining website security.
Google Sign-In, Mailchimp or other embedded third-party services may also use their own cookies or similar technologies according to their respective policies.
We do not use a trial-identification cookie because the application no longer provides two free tests to unregistered users.
6. Data retention
We retain information only for as long as it is reasonably needed for the purpose for which it was collected.
Our general retention practices are:
Active account information: Retained while your account remains active.
Deleted account information: Removed from active systems as soon as reasonably practicable, normally within 30 days. Residual copies may remain temporarily in restricted backups until those backups are overwritten.
Gemini API key: Retained while it remains connected to your account or until you remove the key or delete your Content Repurposer account.
Pasted and generated content: Not intentionally stored as generation history in the Content Repurposer database.
Content extracted from a Blog Post URL: Temporarily cached for up to one hour.
Security and error records: Kept for a limited period appropriate for troubleshooting, security and legal compliance.
Support communications: Normally retained for up to 12 months after the support request is resolved, unless longer retention is reasonably necessary.
Marketing records: Retained while you remain subscribed and for a limited period afterward when necessary to record your consent or honour your unsubscribe request.
Information may be retained longer when required by law or reasonably necessary for fraud prevention, security investigations, dispute resolution or legal claims.
7. Data security
We use reasonable administrative and technical measures to protect personal information.
These measures include securely hashing account passwords and encrypting stored Gemini API keys.
However, no website, transmission method or storage system can be guaranteed to be completely secure. You are responsible for protecting your password and Gemini API key and for notifying us if you believe either has been compromised.
8. International data processing
Some service providers, including Google and Mailchimp, may process information outside India.
Where this happens, information is handled according to the provider’s applicable privacy terms and any legal requirements governing the transfer or processing.
9. Marketing communications
Account and service-related messages are separate from marketing emails.
We will send Onnet’s informative and marketing emails only if you voluntarily subscribe through the Mailchimp form or another clearly identified subscription process.
You may unsubscribe at any time by clicking the unsubscribe link in a marketing email.
Unsubscribing from marketing emails does not delete your Content Repurposer account. Similarly, deleting your Content Repurposer account may not automatically remove a separate Mailchimp subscription. You may use the unsubscribe link or contact us for assistance.
10. Your choices and rights
Subject to applicable law, you may ask us to:
Confirm whether we hold personal information about you;
Provide a copy of your account information;
Correct inaccurate account information;
Remove your stored Gemini API key;
Delete your Content Repurposer account;
Withdraw marketing consent; or
Address a concern about how your information is handled.
The application may provide the following account controls:
Download My Personal Data
Delete My Content Repurposer Account
We may need to verify your identity before completing a privacy or account-deletion request.
If your WordPress account is also used for another Onnet application, deleting Content Repurposer access may remove only the information and access associated with Content Repurposer. We will not delete information required to operate another service that you continue to use without explaining the effect to you.
Onnet’s Content Repurposer is intended for people who are at least 18 years old.
We do not knowingly create accounts for or collect personal information from children. If you believe a child has provided personal information, please contact us so that we can review and remove it where appropriate.
12. Third-party websites
The application may contain links to other websites or services.
We are not responsible for the content, security or privacy practices of websites and services operated by other organisations. You should review their privacy policies before providing personal information.
13. Changes to this Privacy Policy
We may update this Privacy Policy when the application, our practices or applicable requirements change.
The updated policy will be published with a revised “Last updated” date. If a change is significant, we may provide an additional notice through the application or by email.
14. Contact us
The person responsible for the operation of Onnet’s Content Repurposer and the handling of personal information is:
Onnet, operated by Bikash Saha Ward No. 2, Near Forest Office P.O. Gauripur, District Dhubri Assam – 783331, India
These Terms and Conditions govern your use of Onnet’s Content Repurposer, available at https://ontheinternet.in/cr.
Onnet’s Content Repurposer is operated by Bikash Saha under the name Onnet.
By creating an account or using the application, you agree to these Terms and Conditions.
1. About the service
Onnet’s Content Repurposer is a free application that uses artificial intelligence to transform Blog Posts and other written content into relevant content formats.
The application may analyse the submitted content and automatically determine which output formats are relevant. The number and types of generated formats may vary depending on the content.
AI-generated content may occasionally be incomplete, inaccurate or unsuitable. You are responsible for reviewing and editing generated content before publishing or otherwise using it.
2. Eligibility
You must be at least 18 years old and legally capable of accepting these Terms and Conditions.
If you use the application on behalf of a business or organisation, you confirm that you have permission to act on its behalf.
3. Creating an account
You may create an account by:
Providing your name, email address and password; or
Using the “Continue with Google” option.
You must provide accurate information and keep your account credentials secure.
You are responsible for activity performed through your account. Please contact us promptly if you believe your account has been accessed without permission.
4. Gemini API key
To generate content, you may be required to provide your own Google Gemini API key.
Your API key is associated with your Google account or Google Cloud project. Your use of Gemini is also governed by Google’s applicable terms, policies, usage limits and pricing conditions.
You are responsible for:
Providing a valid API key;
Protecting and managing your API key;
Monitoring any usage, limits or charges associated with it; and
Complying with Google’s applicable terms and policies.
Onnet is not responsible for charges, restrictions, suspension or other actions applied to your Google account, Gemini API key or Google Cloud project.
You should remove or replace your API key if you believe it has been compromised.
5. Content submitted to the application
You may submit content by pasting text or providing a Blog Post URL.
You retain ownership of the content you submit and the content generated for you, to the extent permitted by applicable law and the terms of the AI service provider.
By submitting content, you give Onnet permission to process and transmit it only as necessary to provide the Content Repurposer service.
You must have the necessary rights or permission to submit the content. You must not submit content that:
Infringes copyright, trademarks or other rights;
Is unlawful, fraudulent, abusive or harmful;
Contains malicious code or attempts to interfere with the application;
Violates another person’s privacy;
Is intended to generate illegal or harmful material; or
Violates Google Gemini’s applicable policies.
6. Your responsibility for generated content
Generated content is provided as a starting point and should not be treated as professional, legal, medical, financial or other specialist advice.
Before using generated content, you are responsible for checking its:
Accuracy;
Quality;
Suitability;
Originality;
Legal compliance; and
Compliance with the rules of any website or social media platform where it will be published.
Onnet does not guarantee that generated content will be unique, error-free, factually accurate or suitable for a particular purpose.
7. Acceptable use
You must not:
Attempt to gain unauthorised access to the application or another user’s account;
Disrupt, damage or overload the application;
Use automated methods to abuse or excessively access the service;
Reverse-engineer or misuse the application;
Use the application for unlawful, deceptive or harmful activities;
Upload malware or harmful code; or
Use the service in a manner that may expose Onnet or another person to legal liability.
We may restrict or terminate access when we reasonably believe these Terms have been violated or the application is being misused.
8. Third-party services
The application may depend on third-party services, including:
Google Sign-In;
Google Gemini;
Website hosting and security providers;
Email-delivery providers; and
Mailchimp, if you voluntarily subscribe to Onnet’s marketing emails.
These services operate under their own terms and privacy policies. Onnet does not control and is not responsible for the availability, operation or independent practices of third-party services.
9. Marketing emails
Creating a Content Repurposer account does not automatically subscribe you to Onnet’s informative or marketing emails.
You may voluntarily subscribe through the separate Mailchimp Email Sign Up form. You can unsubscribe at any time by using the unsubscribe link included in a marketing email.
Account-related and essential service communications are separate from optional marketing emails.
10. Availability and changes
The application is provided free of charge.
We may modify, update, suspend or discontinue any part of the application when necessary. We do not guarantee that the application will always be available, uninterrupted or free from errors.
We may introduce, remove or change features and usage limitations in the future. If a material change affects users, we will provide reasonable notice where appropriate.
11. Intellectual property
The application, its name, logo, interface, design and original software are owned by or licensed to Onnet and are protected by applicable intellectual-property laws.
These Terms do not transfer ownership of the application or Onnet’s intellectual property to you.
12. Account termination and deletion
You may stop using the application at any time.
You may request deletion of your Content Repurposer account through the account settings or by contacting support@ontheinternet.in.
Because Onnet may operate multiple applications through the same website and user system, deleting your Content Repurposer access may not necessarily delete information that you separately use with another Onnet application. We will explain this where applicable.
Deleting your Content Repurposer account does not automatically unsubscribe you from Mailchimp marketing emails. You can unsubscribe using the link provided in those emails.
We may suspend or terminate an account that violates these Terms, threatens the security of the application or is used for unlawful activities.
13. Disclaimer
The application is provided on an “as available” basis.
To the extent permitted by law, Onnet makes no guarantee regarding:
Continuous availability;
Accuracy or quality of generated content;
Compatibility with every device or browser;
Results obtained from using generated content; or
Continued availability of a third-party service.
Nothing in these Terms excludes any right or protection that cannot legally be excluded.
14. Limitation of liability
To the extent permitted by applicable law, Onnet and Bikash Saha will not be responsible for indirect, incidental or consequential losses arising from:
Your use of or inability to use the application;
Your publication or use of generated content;
Inaccurate or unsuitable AI-generated content;
Loss or exposure of an API key caused by the user;
Charges associated with a third-party service;
Unauthorised access caused by a user’s failure to protect account credentials; or
Failure, suspension or modification of a third-party service.
15. Privacy
Our collection and use of personal information are explained in the Privacy Policy for Onnet’s Content Repurposer.
16. Changes to these Terms
We may update these Terms when the application, our practices or applicable requirements change.
The updated version will be published with a revised “Last updated” date. If a change is significant, we may also provide an additional notice.
Your continued use of the application after the updated Terms take effect indicates your acceptance of them.
17. Governing law and jurisdiction
These Terms are governed by the laws of India.
Subject to applicable law, disputes relating to these Terms or the application will fall under the jurisdiction of the competent courts in Dhubri, Assam, India.
18. Contact us
Onnet’s Content Repurposer is operated by:
Onnet, operated by Bikash Saha Ward No. 2, Near Forest Office P.O. Gauripur, District Dhubri Assam – 783331, India
Adding Continue with Google or Sign in with Google allows users to create an account or sign in using their existing Google Account instead of creating another username and password.
For a web application, the process involves two sides:
Google Cloud / Google Auth Platform This is where you create and configure the OAuth application and obtain the Client ID.
Your website or application This is where the Client ID is integrated and Google’s authentication response is processed.
Google currently recommends Google Identity Services for Sign in with Google. For authentication, the standard identity scopes are openid, email, and profile. (Google for Developers)
Before You Start
You should have:
A Google Account
A website using HTTPS
Access to your website/application configuration
The domain where Google Sign-In will operate
A support/contact email
Ideally, a Privacy Policy and Terms and Conditions before making the integration public
You do not need to purchase Google Cloud credits simply to create the OAuth client for this setup.
Steps to obtain Client ID from Google Cloud / Google Auth Platform
Step 1: Open Google Cloud Console
Sign in to Google Cloud Console and create a project specifically for the application you are integrating.
For our implementation, we initially had another Google Cloud project but decided it was cleaner to create a dedicated project:
Oe – Skills eCourses
Using a dedicated project makes the OAuth configuration easier to identify and manage later.
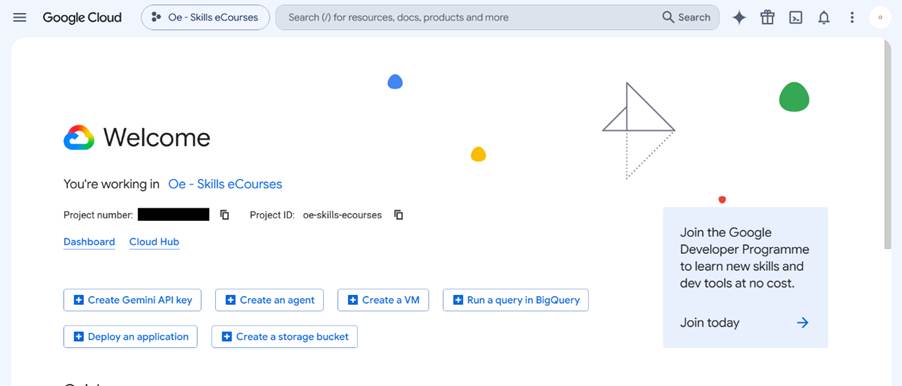
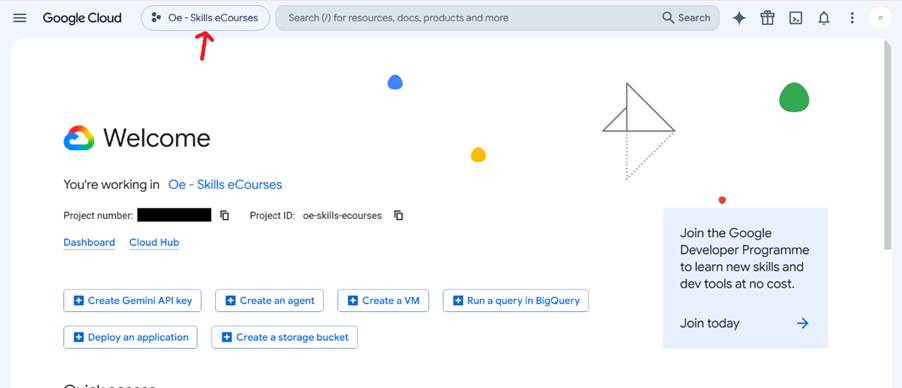
In above screenshot, at the left-side of the header after Google Cloud logo you can see 3 dots with “Oe – Skills eCourses”. That is where you will have to click to create a Project.
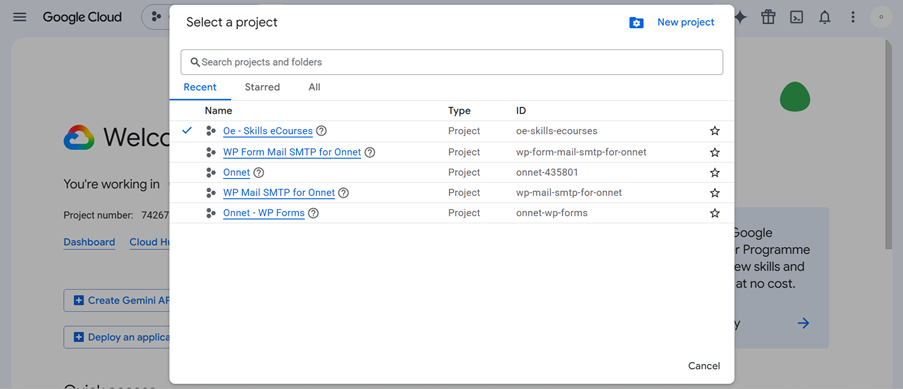
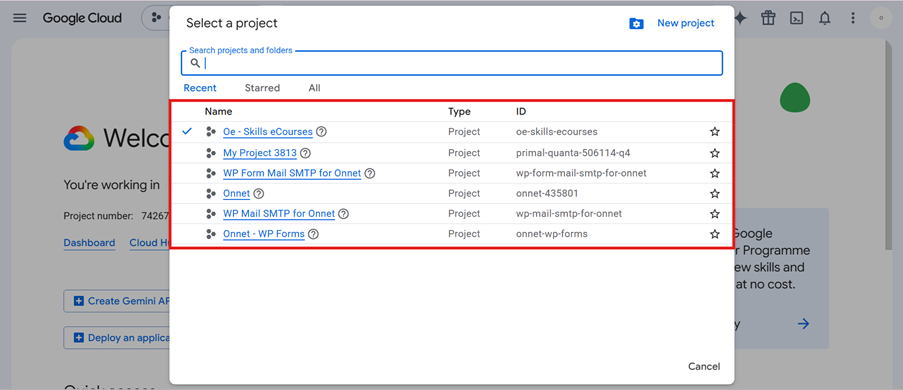
After you will click, you will get a pop-up window where you will have to create a New Project. Please see below screenshot:
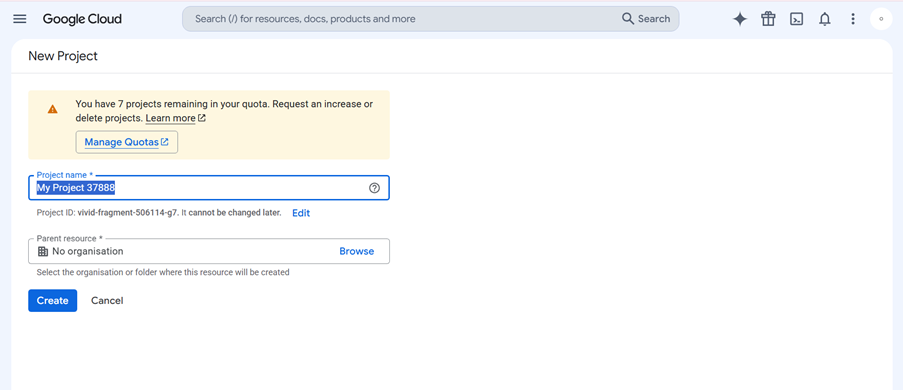
Click on New project at the right-side of the pop-up window and you will go to New Project page. See below screenshot:
Here give the Project Name, for example, we gave Oe – Skills eCourses and hit the Create button.
After the project is created go the header after Google Cloud logo where you can see 3 dots and click on it to select the project you created. By default the project you created should be selected if not please follow the step. See below screenshot:
Click on it and select the project you have created. See below screenshot for reference:
Step 2: Open Google Auth Platform
With the correct project selected, navigate to:
Google Cloud → Google Auth Platform
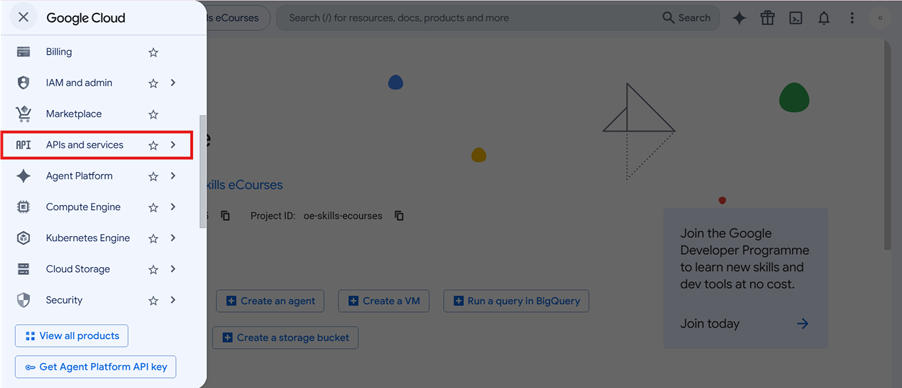
At the top left of the Google Cloud platform you will see a sandwich menu, click on it and scroll till you see APIs and services.
See below screenshot:
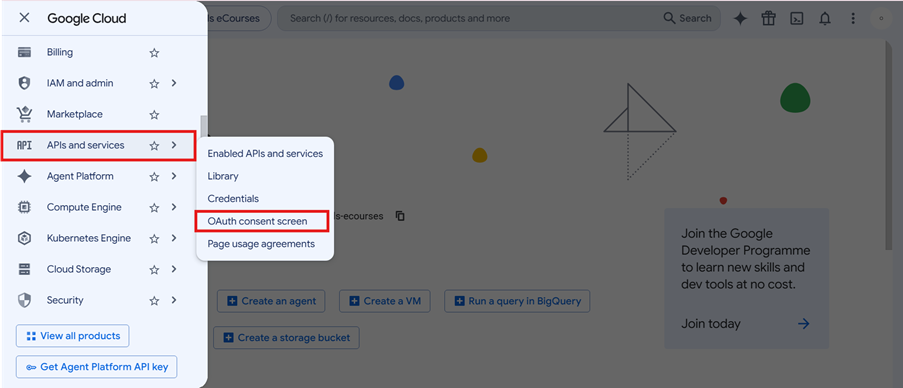
Click on APIs and services then OAuth consent screen. See below screenshot for reference:
Step 3: Configure App Information
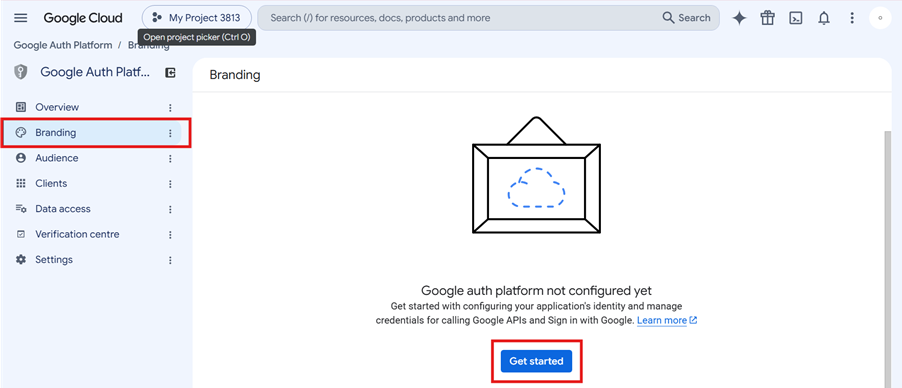
After you have reached the OAuth consent screen in the left menu you will see Branding. Click on Branding and then Get Started. See below screenshot for reference:
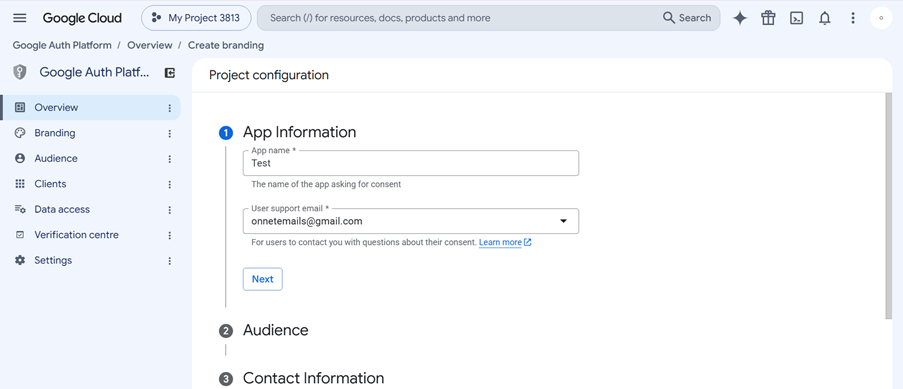
The first part of the setup asks for basic information about your application.
App name
Enter the name users should associate with the application.
For example, ours is:
Oe
This is important because the name can appear to users during Google’s authentication/consent process.
User support email
Select an email address users can use if they have questions about signing in or granting consent.
For Oe, we selected the appropriate Google account email during testing.
Click Next.
See below screenshot for reference:
Google describes this information as part of the OAuth consent-screen configuration presented to users. (Google for Developers)
Step 4: Select the Audience
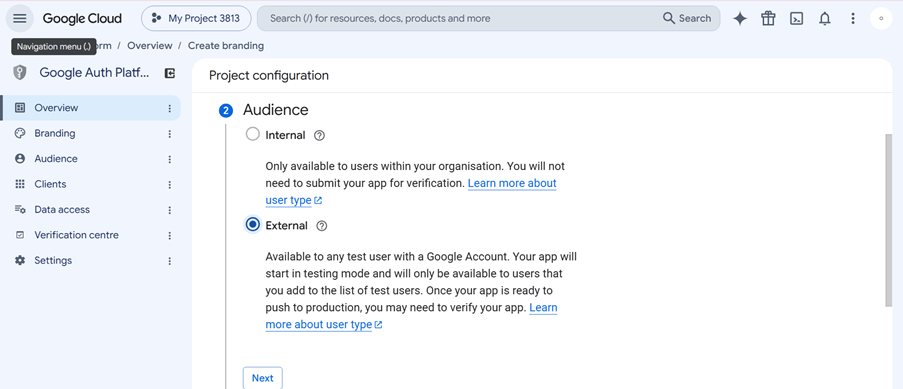
Google will ask whether the application is:
Internal
or
External
For a public website where people outside your own Google Workspace organisation should be able to register, select:
External
Internal is intended for users belonging to your Google Workspace organisation.
Since Oe will eventually allow people generally to create accounts, we selected External.
During development, an External application can remain in Testing status, meaning only explicitly added test users can use it. (Google for Developers)
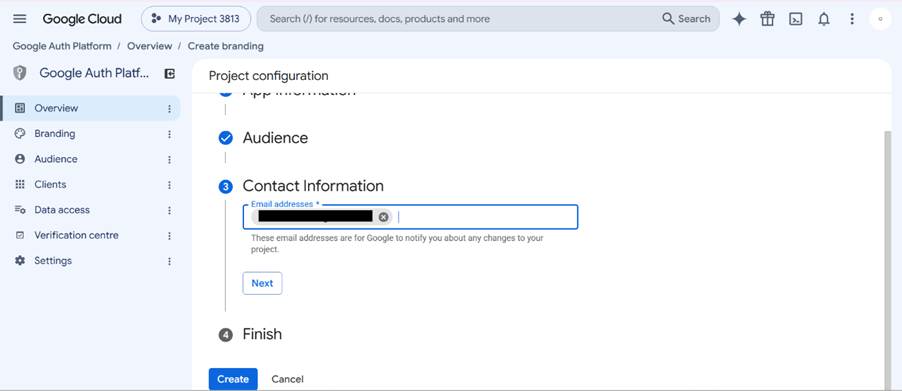
This is primarily used by Google to contact you about the OAuth project, including important configuration or policy matters.
Enter an email address you regularly monitor and click Next. See below screenshot for reference:
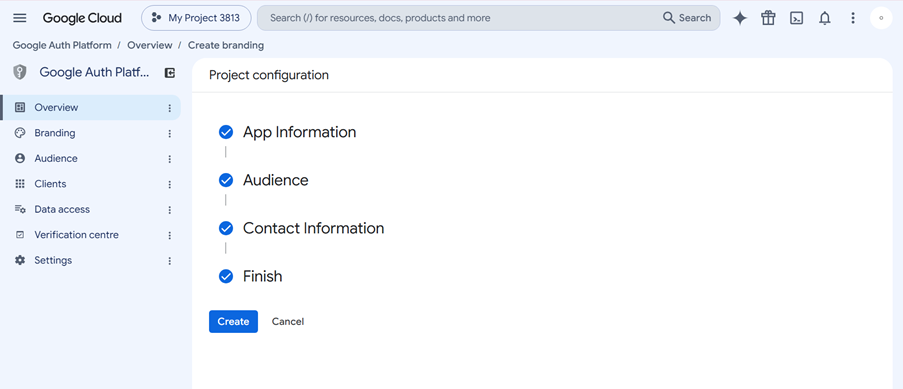
After you have clicked “Next” you have reached the last step here that is Finish. Here you will have to agree to Google API services user data policy and hit the “Continue” button then “Create” button. See below screenshot for reference:
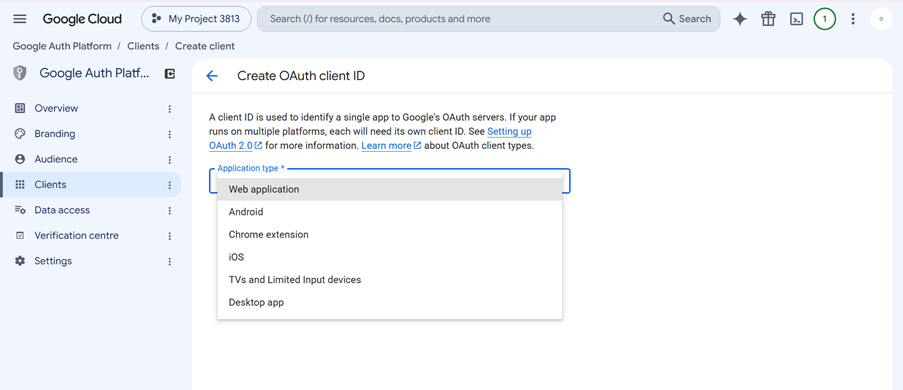
Step 6: Create an OAuth Client
Once the Google Auth Platform has been configured, go to:
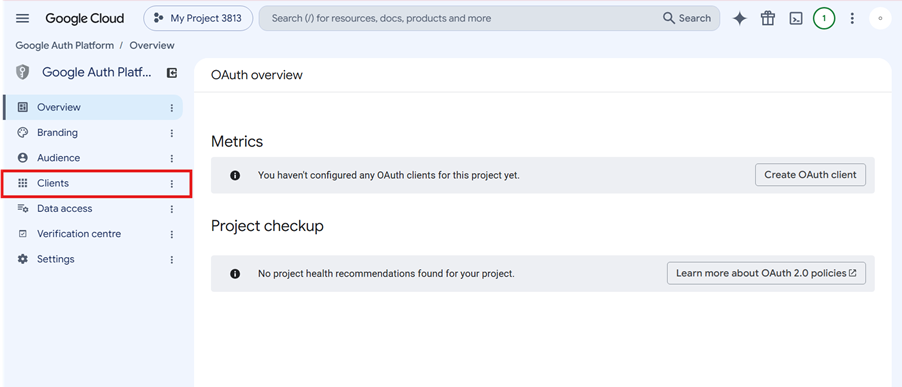
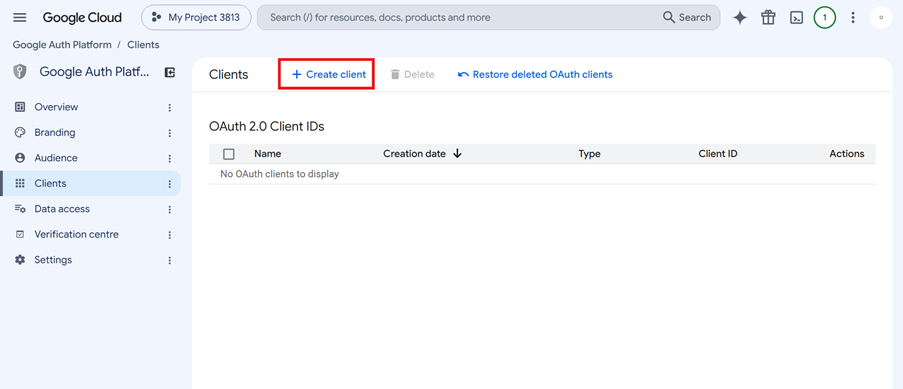
Google Auth Platform → Clients then click Create client
See below screenshots for reference:
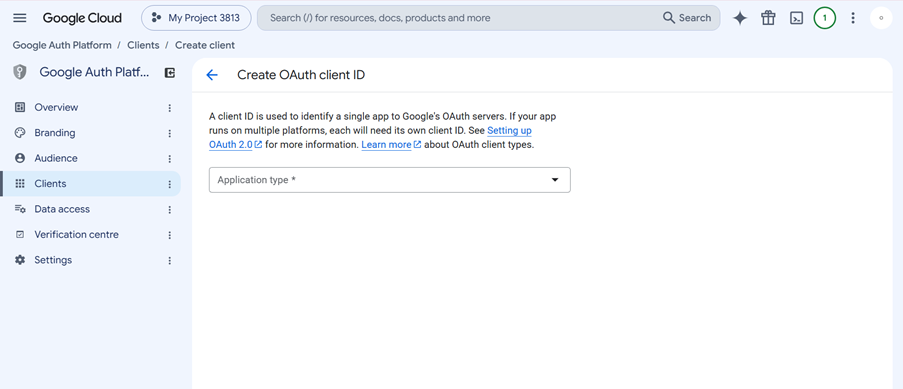
Here from the Application type dropdown you will have to select Web application. See below screenshots for reference:
Google states that a Web Application OAuth Client ID is the appropriate client type for applications accessed through a web browser. (Google for Developers)
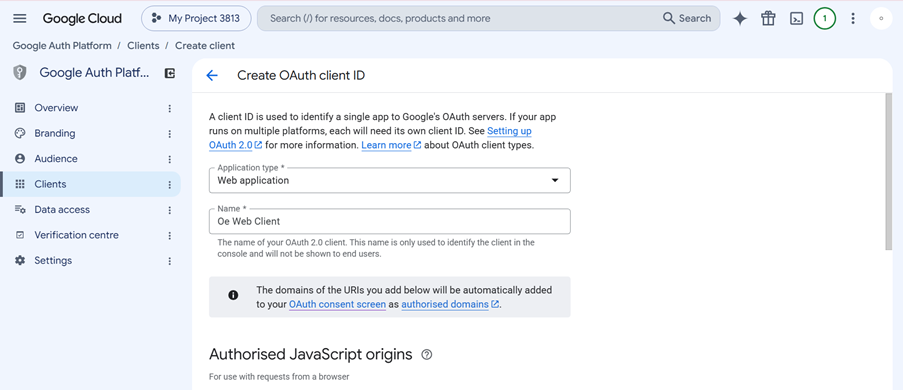
Give the client an identifiable internal name. For example, we gave:
Oe Web Client
The name is for your own Google Cloud management and isn’t the application’s public name.
Please see below screenshot for reference:
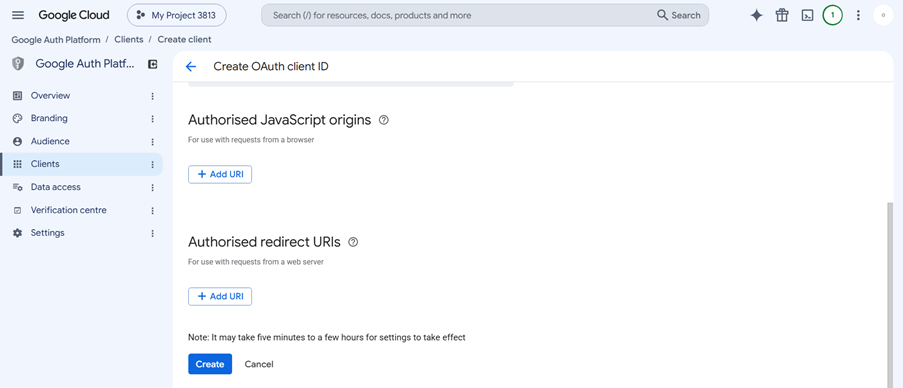
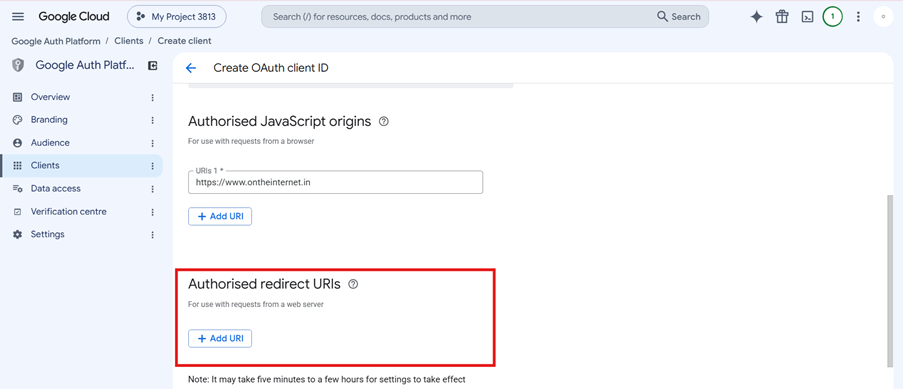
Step 7: Configure Authorized JavaScript Origins
This part is particularly important.
Under:
Authorized JavaScript origins
click:
+ Add URI
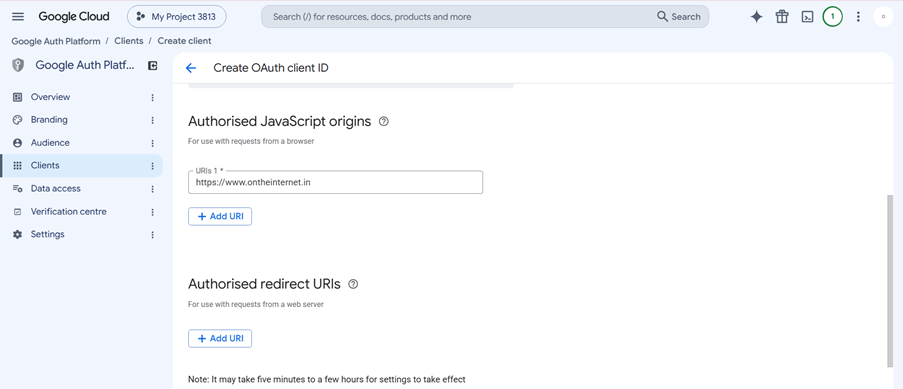
Enter the origin of the website where Google Sign-In will run.
For Oe (our project), we gave:
https://ontheinternet.in
Notice that this is the origin, not the full application URL.
Google specifies that an Authorized JavaScript Origin contains the scheme and hostname and must not contain a path, query or fragment. (Google Support)
So:
Correct
https://example.com
Incorrect
https://example.com/my-app
See below screenshots for reference:
For production websites, HTTPS should be used. Google provides an exception for localhost during development. (Google for Developers)
Step 8: Determine Whether You Need an Authorized Redirect URI
The same screen contains Authorized redirect URIs. Please see below screenshot:
Whether this needs to be populated depends on how your application implements Google authentication.
If Google returns authentication through a JavaScript callback, a redirect URI may not be required.
If your application uses a server-side redirect flow, you must enter the exact callback URL expected by your application. Google sends the user back to that endpoint after authentication. (Google Support)
For someone following this guide for another WordPress plugin or application, check that application’s documentation for its callback/redirect URL.
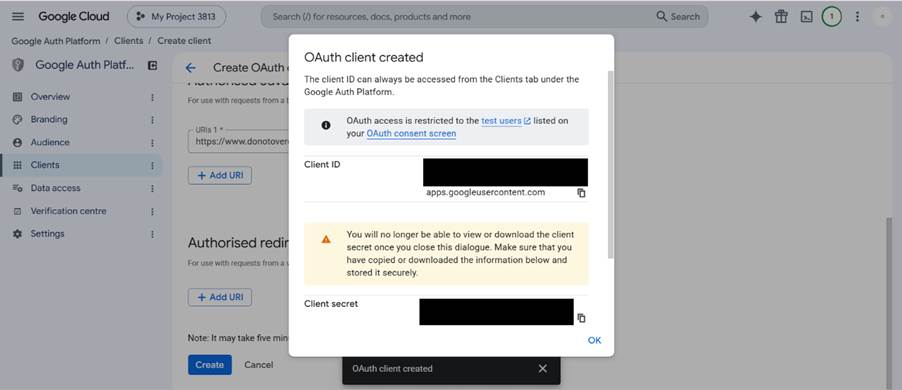
Step 9: Copy Client ID
After entering the required information, click:
Create
Google will generate your OAuth credentials.
The important value for Sign in with Google is the:
Google’s documentation confirms that this Client ID identifies your application to Google’s OAuth servers. (Google for Developers)
Keep the Client Secret Private
Depending on the implementation, Google may also generate a Client Secret.
A Client ID is designed to be used by the application to identify itself, including in browser-side Sign in with Google integrations. A Client Secret must not be exposed publicly or embedded in client-side code.
For Oe’s implementation, we needed the Client ID.
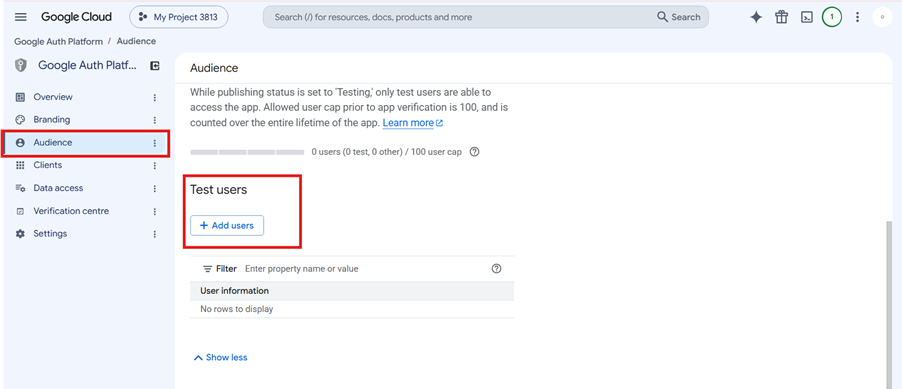
Step 10: Add a Test User
Before making the application publicly available, it is sensible to test it.
Go to:
Google Auth Platform → Audience
If the Publishing status is:
Testing
scroll to:
Test users
Click:
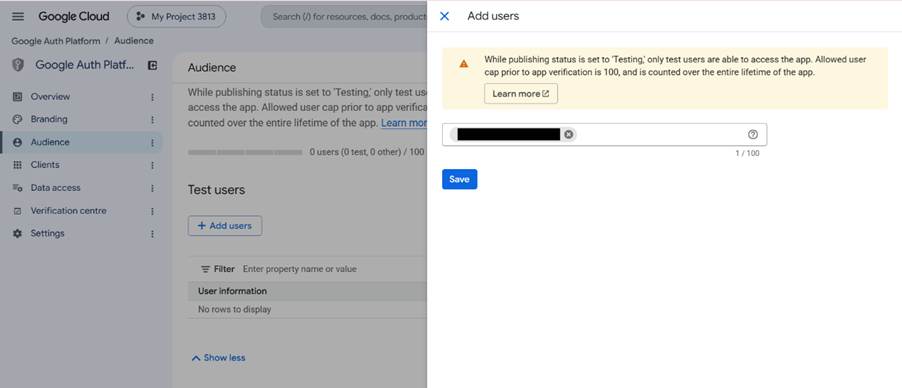
+ Add users
Enter the Google Account you want to use for testing.
For example:
your-test-account@gmail.com
Save it.
See below screenshots for reference:
While an External application is in Testing mode, only users added as test users can access it. (Google for Developers)
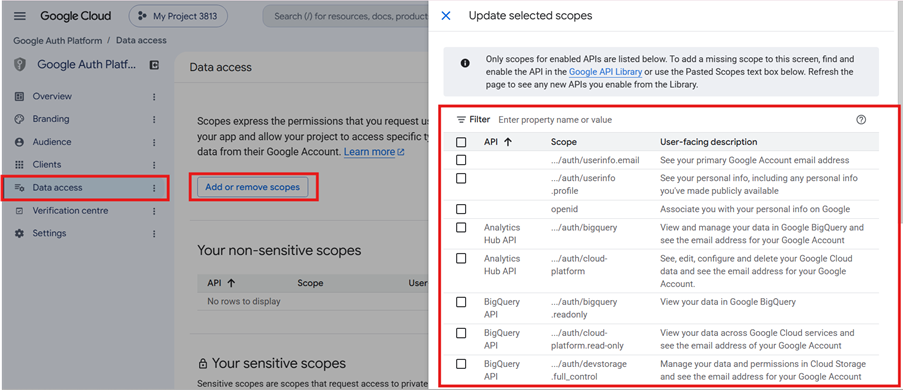
This page controls the OAuth scopes your application requests.
A simple Sign in with Google implementation generally needs identity information such as:
OpenID identity
Email address
Basic profile information
See below screenshot for reference:
Google identifies openid, email, and profile as the standard authentication scopes. (Google for Developers)
Do not request Gmail, Google Drive, Calendar or other Google data simply for account registration.
A good security principle is:
Request only the information your application genuinely needs.
Google also recommends choosing the narrowest scopes possible; sensitive and restricted scopes can trigger additional verification requirements. (Google for Developers)
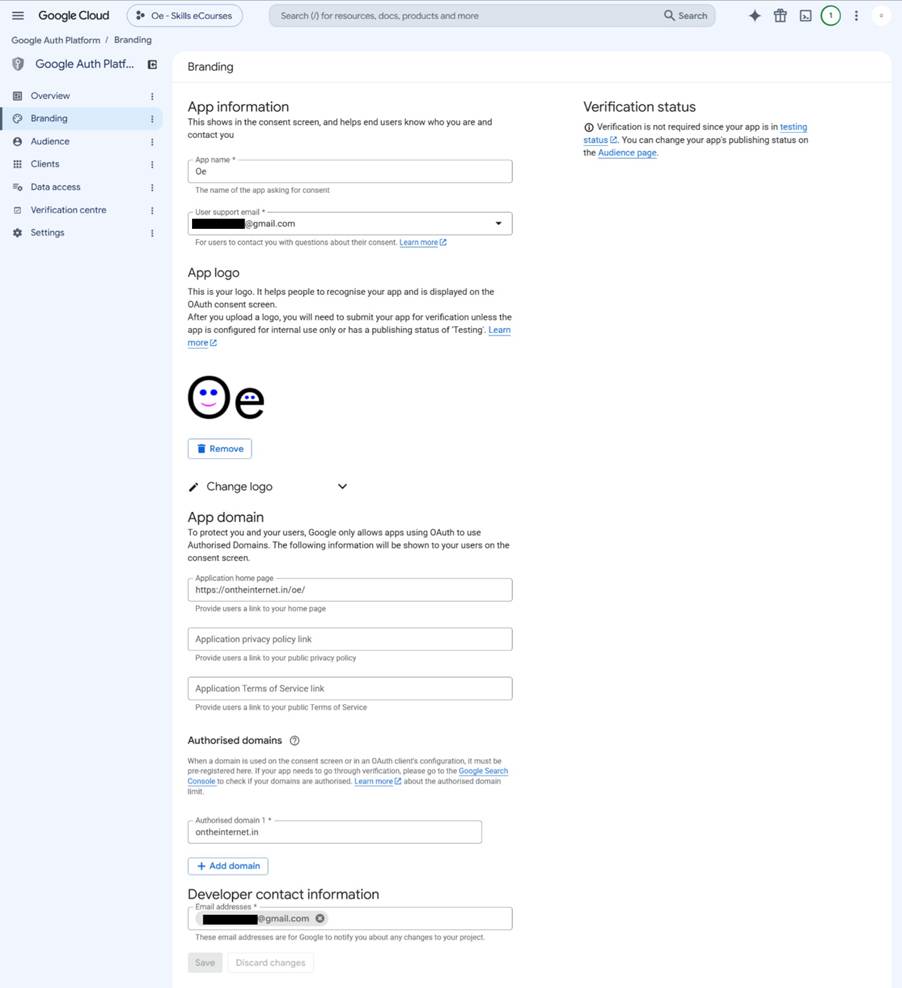
Step 12: Complete the Branding
Go to:
Google Auth Platform → Branding
Here you can configure how your application is represented to users.
Important information can include:
App name
User support email
App logo
Application home page
Privacy Policy
Terms of Service
Authorized domain
Developer contact information
For Oe, we configured:
App name: Oe
Application home page: https://ontheinternet.in/oe/
Authorized domain: ontheinternet.in
We also uploaded the Oe logo.
Google explains that branding information such as the product name, logo and homepage can appear during the user authentication/consent experience. (Google for Developers)
Privacy Policy and Terms
For a production application, complete the public:
Privacy Policy URL
and
Terms of Service URL
before publishing the OAuth application.
Google can display the application’s Privacy Policy and Terms alongside other application information during authorization. (Google for Developers)
Adding the Client ID to a setting is only the beginning. The website must also display Google’s sign-in interface, receive the authentication response, verify it securely, create or find the correct local account, and establish the website’s own logged-in session.
The exact screens and files differ between WordPress plugins, website builders and custom applications, but the responsibilities below remain the same.
Choose the Implementation Route
Plugin or authentication service: If your WordPress plugin, membership system or authentication provider already supports Google Sign-In, enter the Client ID in its Google authentication settings. If it requests a Client Secret or callback URL, obtain those values from the same OAuth client and add the exact callback URL to Authorized redirect URIs in Google Cloud. Enable Google Sign-Up and Google Sign-In, choose where the button should appear, and save the settings.
Custom-built application: A developer must integrate Google Identity Services in the front end and create a secure login endpoint on the server. The browser-side button alone is not a complete authentication system.
Important: Use the configuration instructions supplied by your plugin or framework. Do not invent a redirect URI, and never place a Client Secret in HTML, JavaScript, a public repository or another browser-visible location.
Display the Google Button
Load the Google Identity Services library on the Sign-Up and Sign-In pages. Google requires this library to be loaded from accounts.google.com rather than self-hosted. A simple HTML-based implementation can look like this:
Replace YOUR_GOOGLE_CLIENT_ID with the Client ID created earlier and replace the example login endpoint with your website’s real HTTPS endpoint. The endpoint must belong to your site and must be prepared to receive Google’s POST response.
You can also use Google’s JavaScript API and a callback function. In that version, the callback receives response.credential, which is a Google-signed ID token, and sends it to your backend over HTTPS. Whether you use the HTML or JavaScript approach, the token must be verified on the server.
Receive and Verify the Google Credential on the Server
When the user chooses a Google Account, Google returns a signed JSON Web Token (JWT), commonly called an ID token. The website’s login endpoint must not trust profile data merely because it arrived from the browser.
Use Google’s official server-side library for your programming language, or a correctly configured JWT library, to verify all of the following:
The token signature is valid and was signed using Google’s current public keys.
The aud (audience) claim matches your website’s Google Client ID.
The iss (issuer) claim is accounts.google.com or https://accounts.google.com.
The exp (expiry) time has not passed.
The request passes your Cross-Site Request Forgery (CSRF) protection. For Google’s HTML POST flow, validate the g_csrf_token value using Google’s documented double-submit-cookie check.
Do not simply decode the JWT and accept its contents. Decoding shows the claims; verification proves that the token is authentic and intended for your application.
Create, Match or Link the Local Website Account
After successful verification, the server can read Google’s user claims. The most important identifier is sub, which is the stable Google Account identifier for your application. Store this value against the local website account. An email address can change and should not be treated as the permanent Google identity key.
The website should then follow a deliberate account-matching flow:
If the verified Google sub is already linked to a local account, sign in that account.
If there is no link, check whether the person is already signed in to a local account and intentionally linking Google. If so, verify the action and save the Google sub against that account.
If a local password account already uses the same email address, use a safe account-linking process instead of silently creating a duplicate or automatically taking over the account. For example, require the user to sign in with the existing method or complete another ownership check before linking.
If no matching account exists, create a new local user using the verified Google identity and the profile details your website genuinely needs.
If mandatory website-specific information is still missing—such as country, user type or acceptance of your Terms and Privacy Policy—send the new user to a short completion form before granting full access.
This is how one Google Account can support both Sign Up and Sign In without creating a new website account on every visit. The visible button wording may differ, but the backend can use the same verified identity-processing logic for both actions.
Create the Website Session
Google authenticates the Google Account; it does not automatically log the user into your website’s own account system. After matching or creating the local account, your server must create its normal authenticated session.
Regenerate or rotate the session identifier after login.
Send the session cookie only over HTTPS and use Secure, HttpOnly and an appropriate SameSite setting.
Do not store the Google ID token in browser storage merely to keep the user logged in.
On logout, destroy the website session. If automatic account selection is enabled, also use the Google Identity Services sign-out guidance so the user is not immediately signed in again.
Handle Success, Cancellation and Errors
After a successful login, redirect the user to the intended page, dashboard or profile-completion screen. Preserve the intended destination safely, but never accept an unrestricted external redirect URL from the browser.
Also show clear messages for cancelled sign-in, an unverified or invalid token, a disabled local account, a missing required field, an account-linking conflict, and temporary server failure. Record technical details in secure server logs without displaying tokens, Client Secrets or sensitive account data to users.
Website-Side Completion Checklist
The Google button appears on both the Sign-Up and Sign-In interfaces where required.
The website sends the Google credential only to its own HTTPS backend.
The backend verifies the token, audience, issuer, expiry and CSRF protection.
The local account stores and matches Google’s stable sub identifier.
Existing accounts are linked safely and duplicate accounts are prevented.
Additional profile fields and legal consent are collected when needed.
The website creates a secure local session and supports normal logout.
Errors are handled without exposing credentials or sensitive data.
Add the Client ID to Your Website/Application
In your website or application.
The exact location depends on how the application was built.
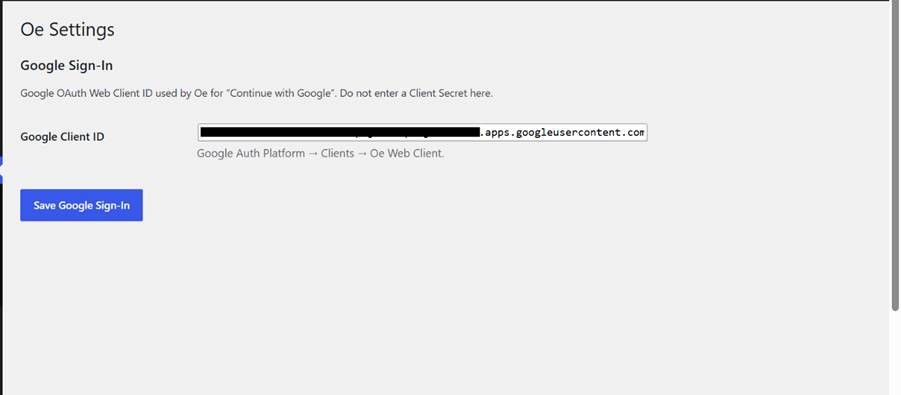
Typically there will be a setting such as:
Google Client ID
Paste the Client ID generated in Google Cloud and save the configuration.
For Oe, this is handled through the Oe plugin’s Google Sign-In settings.
See below screenshot:
The application then uses the Client ID when initializing Google Identity Services. Google also expects the application backend to properly validate the identity information it receives rather than trusting arbitrary user-supplied account information. (Google for Developers)
Test Sign Up with Google
Do not test only while logged into WordPress as an administrator.
Open an Incognito/Private browser window.
Visit the website and choose:
Subscribe / Sign Up → Continue with Google
Select the Google Account that you added under Test users.
Google should authenticate the account and return the user to your application.
Your application can then use Google’s verified identity information—such as the user’s email and profile—to create or locate the corresponding local user account.
Test Sign In with Google
After the account exists, log out.
Select:
Sign In → Continue with Google
Choose the same Google Account.
Instead of creating another account, your application should identify the existing user associated with that Google identity/email and sign them into the existing account.
This is an important implementation rule:
Google Sign-In should not create duplicate website accounts every time the same Google user signs in.
Your website—not Google Cloud—controls how the authenticated Google identity is mapped to its own user database.
Common Errors
origin_mismatch
Check Authorized JavaScript origins.
The domain making the Google authentication request must match one of the registered origins. Google specifically documents an origin_mismatch error for requests originating from an unregistered JavaScript origin. (Google Support)
redirect_uri_mismatch
If your implementation uses a redirect flow, make sure the callback URL sent by your application exactly matches an Authorized redirect URI configured for the OAuth client.
Only the developer can sign in
If the application is still in Testing, make sure the Google Account being used is included under:
Audience → Test users
Sign-In works but creates duplicate accounts
This is generally an application-side account-matching issue rather than a Google Cloud setting. Your application’s authentication logic needs to associate the Google identity with the appropriate existing local account.
Testing Mode vs Production
During development, keeping the OAuth application in Testing is useful because you control which Google Accounts can use it.
But a public application cannot remain limited to your test-user list indefinitely.
When the website is ready for real users, review:
Branding
Homepage
Authorized domain
Privacy Policy
Terms of Service
Requested scopes
OAuth client configuration
Then change the application’s publishing status as appropriate.
Whether Google requires additional verification depends partly on the application’s configuration and scopes. Sensitive or restricted access can involve additional review requirements. (Google for Developers)
For a straightforward authentication system, avoid requesting unrelated Google API permissions.
The Complete Flow
The overall process can be summarised as:
Google Cloud and Google Auth Platform
Create a Google Cloud Project → Open Google Auth Platform → Configure the App Information → Select the External Audience for a public website → Provide Developer Contact Information → Create a Web Application OAuth Client → Add the Authorized JavaScript Origin → Add the exact Authorized Redirect URI if the implementation requires one → Create and copy the Client ID → Add Test Users → Review the requested Data Access scopes → Complete the Branding, Privacy Policy and Terms of Service information.
Website or Application Implementation
Add the Client ID to the website or application → Choose a plugin-based or custom-built implementation → Display the Continue with Google button → Receive the Google credential through the website’s secure HTTPS endpoint → Verify the token signature, audience, issuer, expiry and CSRF protection on the server → Use Google’s stable sub identifier to find the linked local account → Safely link an existing account or create a new local account → Collect any additional profile information and legal consent required by the website → Create a secure logged-in website session → Handle successful authentication, cancellation, errors and logout.
Testing and Production
Test Sign Up with Google using an Incognito or Private browser window and an approved Test User → Confirm that a new local account is created correctly → Log out and test Sign In with Google using the same account → Confirm that the existing account is opened without creating a duplicate → Resolve any origin, redirect URI, Client ID or account-matching errors → Review the OAuth configuration, branding, domains, policies and requested scopes → Change the application’s publishing status when it is ready for public use.
Once everything is configured correctly, Google authenticates the user’s Google Account and returns a verified identity credential. The website or application remains responsible for securely validating that credential, creating or matching the local account, collecting any additional required information, establishing the logged-in session, preventing duplicate accounts and managing the user’s access.
Credits:
This article is drafted with the help of ChatGPT, an AI application. O
Design is not a one-time event. It is an ongoing discipline that requires attention, structure, and consistency.
Every visual your brand publishes—from Social Media posts and Presentations to Website Graphics and Documents—contributes to how people perceive your business. When these materials share a consistent visual style, your brand becomes easier to recognize, understand, and trust.
However, visual consistency does not mean that every design must look exactly the same. It means that each design should feel like it belongs to the same brand.
Here are some practical tips to maintain visual consistency across your brand communications:
Centralize your Brand Assets
Use a shared folder or brand asset library.
Logos, icons, fonts, photographs, illustrations, and other design elements should be stored in one organized location.
You could use a shared cloud folder, a brand asset library, or a digital asset management platform. Organize the assets into clearly labelled folders so that everyone can quickly locate the correct files.
For example, you could create separate folders for:
Primary and Secondary logos
Brand Fonts
Colour Palettes
Icons and Illustrations
Approved Photographs
Social Media templates
Presentation Templates
Brand Guidelines
Centralizing your assets reduces the likelihood of someone using an outdated logo, an incorrect colour, or a low-quality image. It also saves time because team members do not need to search through different devices, messages, or email attachments for the files they need.
Limit your Design Options
Stick to your core fonts, colors, and layouts.
Having too many design choices can make it difficult to maintain a recognizable visual identity.
Define a focused collection of colours, fonts, layouts, and graphic elements that represent your brand. Once you have established them, use them consistently.
Your basic visual system might include:
One primary font and one secondary font
A small core colour palette
Standard heading and body text styles
A few approved layout structures
A consistent style of icons, photographs, or illustrations
Defined logo placements and spacing rules
Limiting your options does not restrict creativity. Instead, it gives your creativity a clear direction. You can still create a variety of designs while ensuring that they remain connected to your brand identity.
Create Reusable Templates
For social media, presentations, documents.
Templates make visual consistency easier to maintain, especially when content is created frequently or by multiple people.
Create reusable templates for common design requirements, such as:
Social Media posts
Carousels
Quote Cards
Blog Featured Images
Presentations
Reports
Proposals
Email Graphics
Internal Documents
Each template should already include your approved colours, fonts, logo placement, margins, and basic layout. Team members can then change the content without redesigning everything from the beginning.
Templates also improve efficiency. They shorten the design process while reducing the risk of accidental inconsistencies.
However, templates should not remain unchanged forever. Review them occasionally to ensure that they still meet your communication needs and accurately represent the brand.
Audit your Contents regularly
Spot and fix off-brand visuals.
Even with guidelines and templates, inconsistencies can gradually appear. A regular visual audit helps you identify and correct them.
Review your Website, Social Media profiles, Presentations, Documents, Advertisements, and other Brand Materials. Look for anything that feels disconnected from your established identity.
Ask questions such as:
Are the correct logo files being used?
Are the brand colours accurate?
Are fonts consistent across platforms?
Do the images share a recognizable style?
Are layouts following the same basic principles?
Are any outdated templates still being used?
Does the content still represent the current brand?
You do not need to redesign everything at once. Start with the most visible or frequently used materials and gradually correct the remaining inconsistencies.
Educate your Team
Share the brand guide, explain why it matters.
A brand guide will only be effective if people understand how and why they should use it.
Share your visual guidelines with Employees, Freelancers, Designers, Agencies, and other collaborators. Show them where the approved assets and templates are stored. Explain how to use them and whom to contact if they have questions.
It is also helpful to explain why visual consistency matters. When people understand that consistency supports recognition, professionalism, and trust, they are more likely to follow the guidelines carefully.
Encourage team members to ask questions instead of guessing. A quick clarification can prevent an off-brand design from being published and reused.
Final Thoughts
Visual consistency is built through repeated, thoughtful decisions. Centralizing assets, limiting design choices, creating templates, defining guidelines, reviewing materials, and educating your team can help you maintain a cohesive brand identity.
The more consistently your brand presents itself, the easier it becomes for people to recognize and remember it.
Inconsistency can confuse your audience. Consistency creates familiarity—and familiarity helps build trust.
Credits:
This article is created with the help of ChatGPT, an AI application.